# Animation Mode
# Adding a New Animation Line
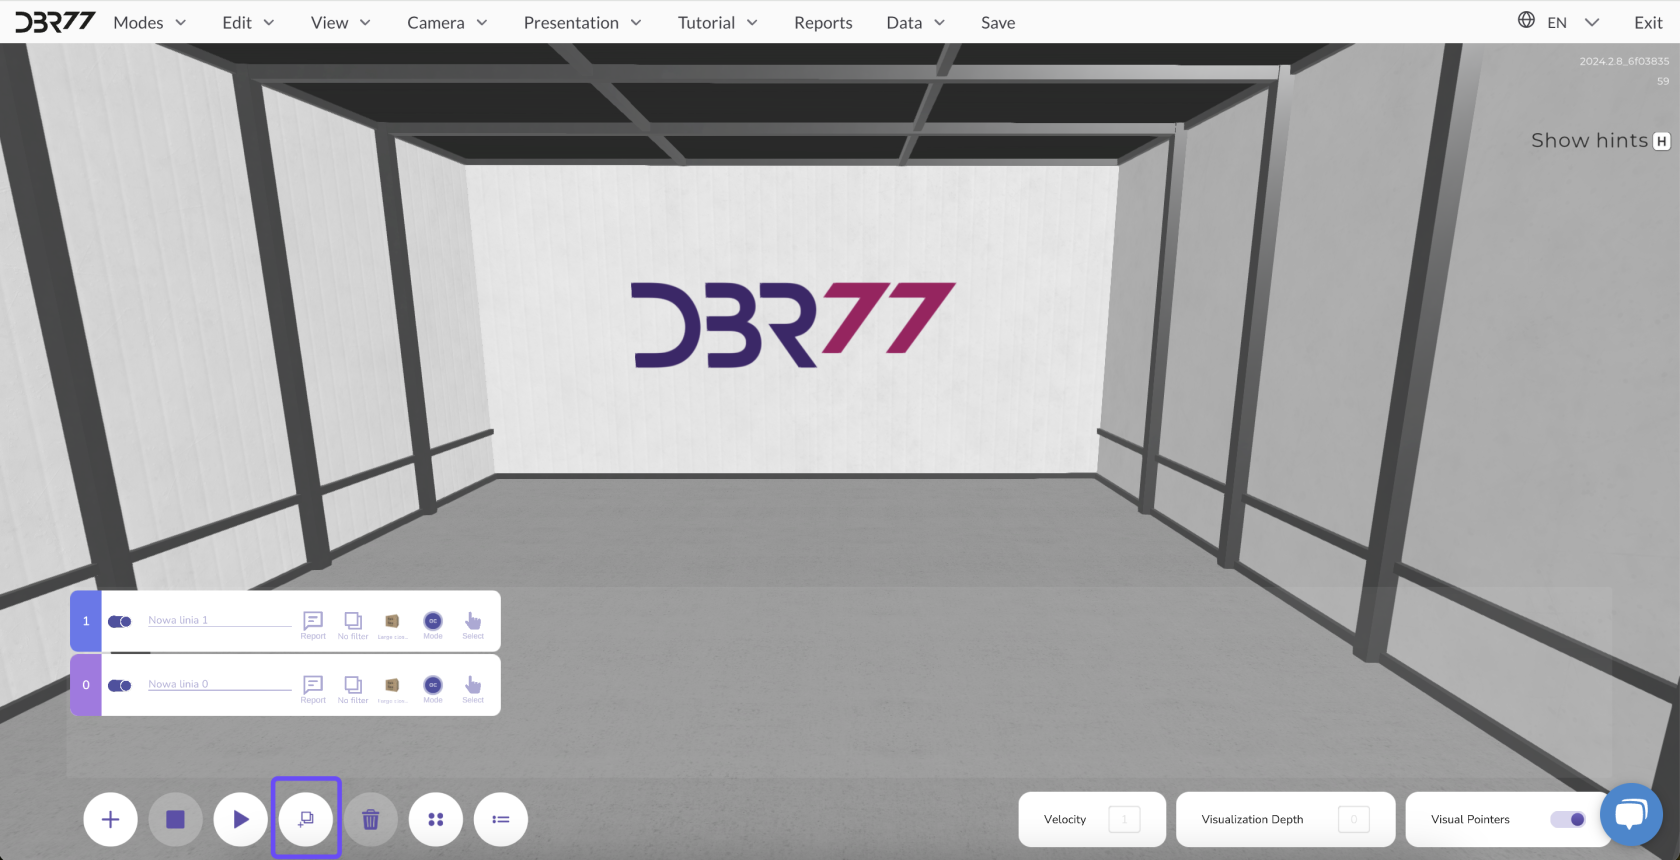
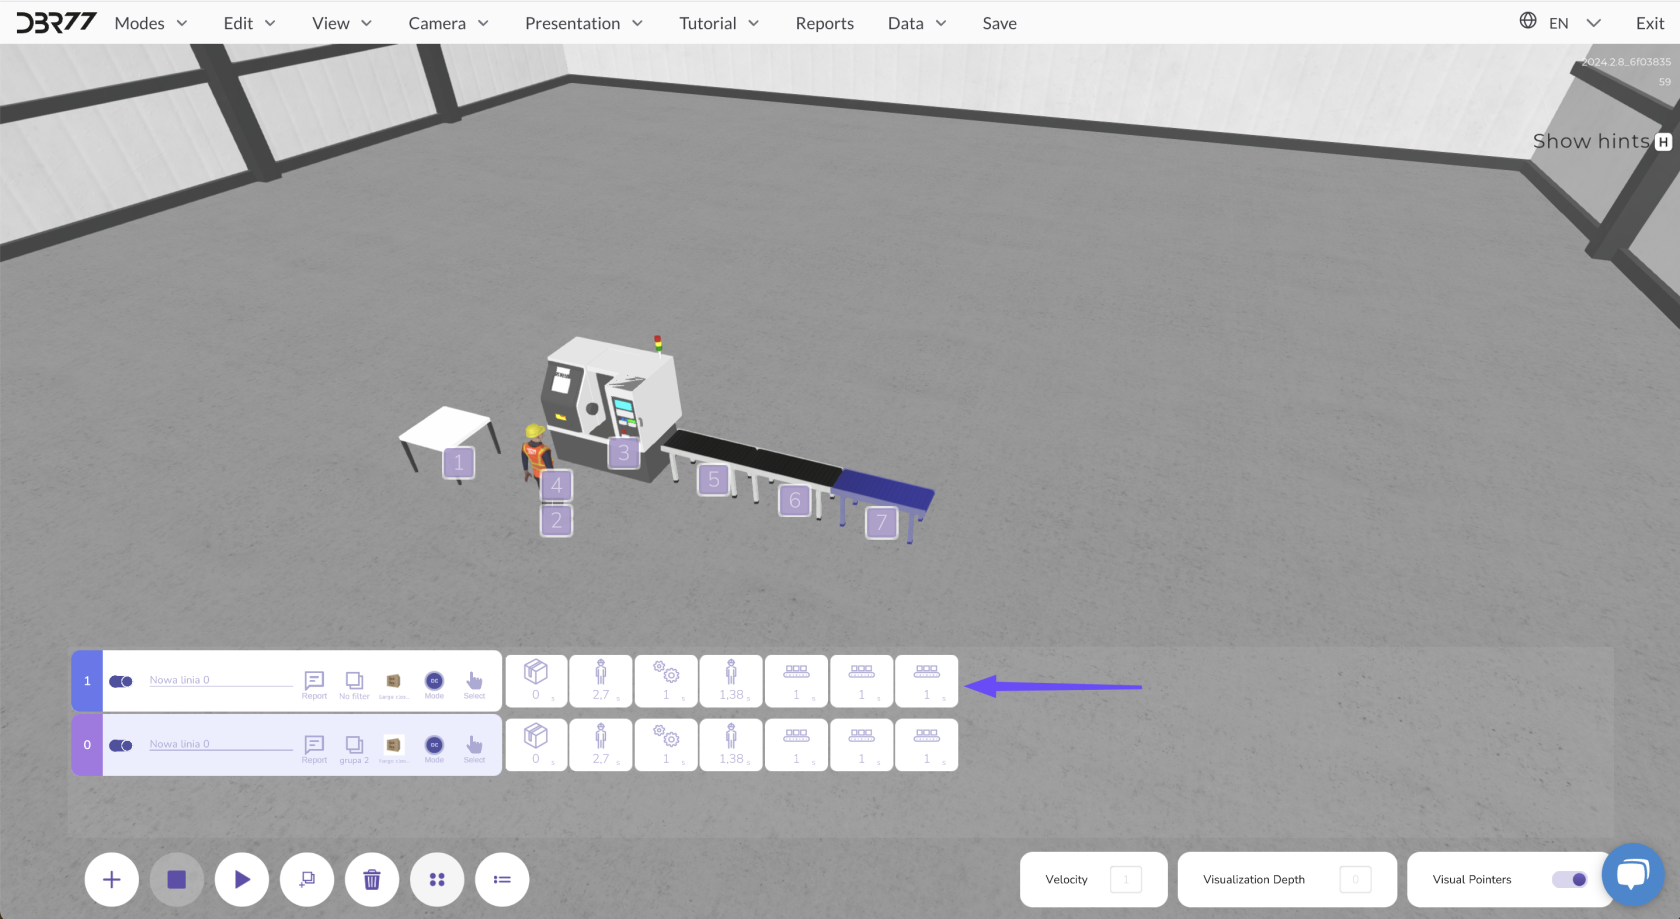
To add a new animation line, switch to animation mode and click the plus sign in the lower-left corner of the screen. This will create a new animation line.
[](https://learn.dbr77.com/uploads/images/gallery/2024-10/R0nW49N0zCBf9p12-image.png)
[](https://learn.dbr77.com/uploads/images/gallery/2024-09/4q4b5U1yWTmplHVZ-gify2-24.gif)
Each new animation line initially consists of the following elements:
[](https://learn.dbr77.com/uploads/images/gallery/2024-09/TMNmCk3o9GOrDLhw-image.png)
### **Functions of the Animation Line**
- **Enable/Disable the Animation Line:** Decide whether an animation line should be active when the animation starts.
If the line is disabled and the slider turns gray, the process will not be executed in the animation.
- **Naming the Animation Line:** Assign a unique name to the line to improve organization.
- **View Report:** Display a report for the animation line both during and after the animation.
- **Filtering:** Group animation lines to display only the ones you are currently working on.
- **Select Detail:** Choose a base detail from the library.
- **Animation Mode:** Select the start mode and playback option for the animation line.
- **Mark Animation Line:** Select a specific animation line for editing or management.
# Filters
Filtering allows you to display only the animation lines you currently want to work on. This simplifies the management of multiple animation lines and helps you focus on a specific group.
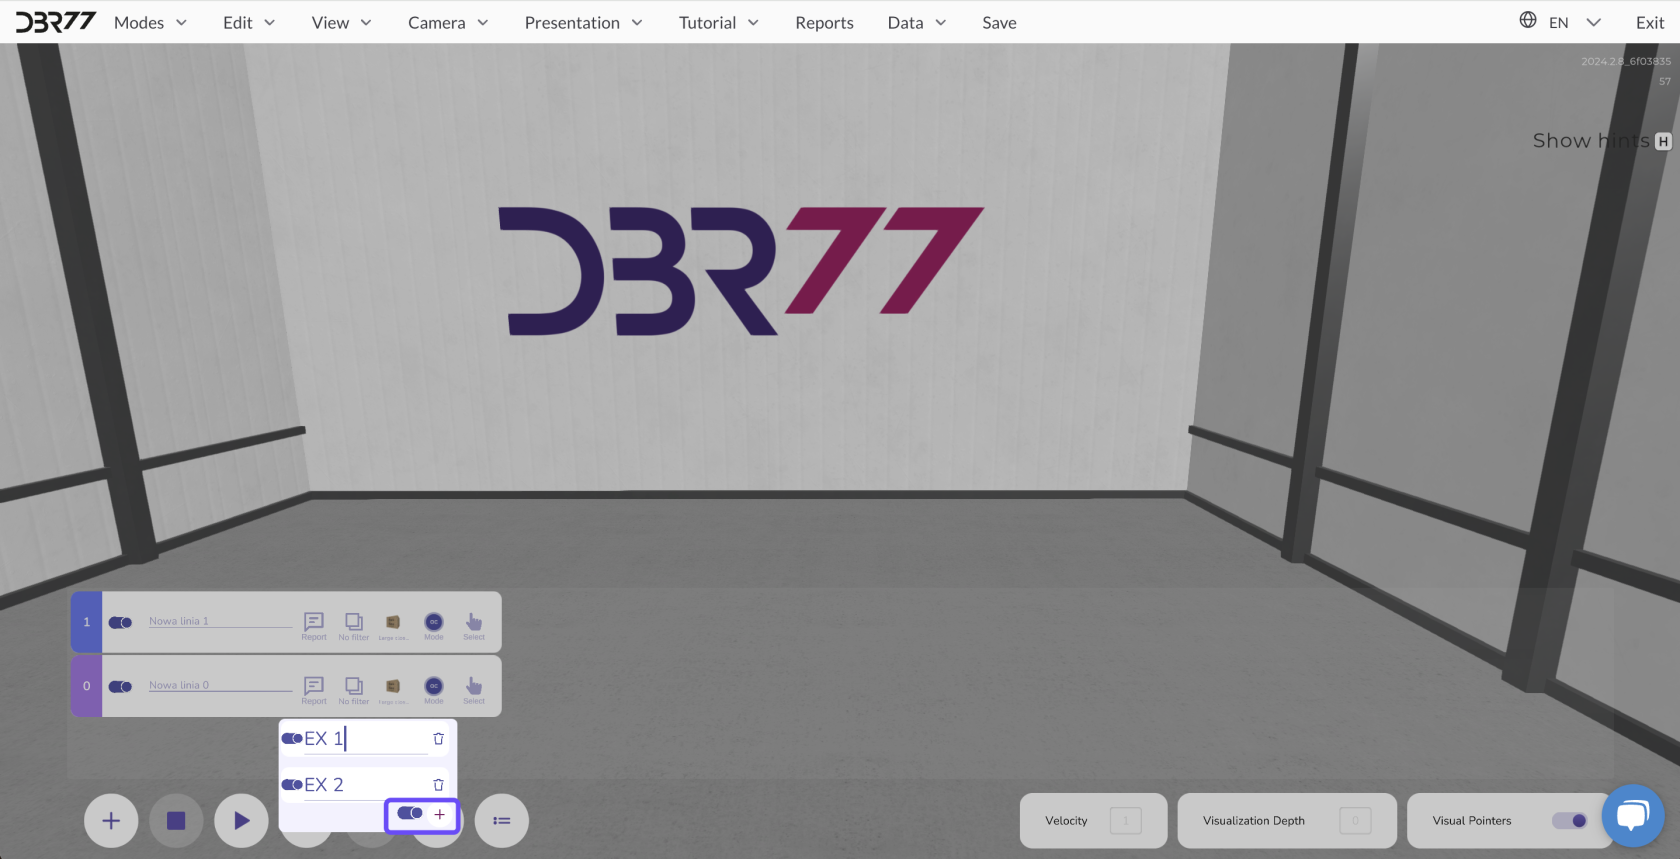
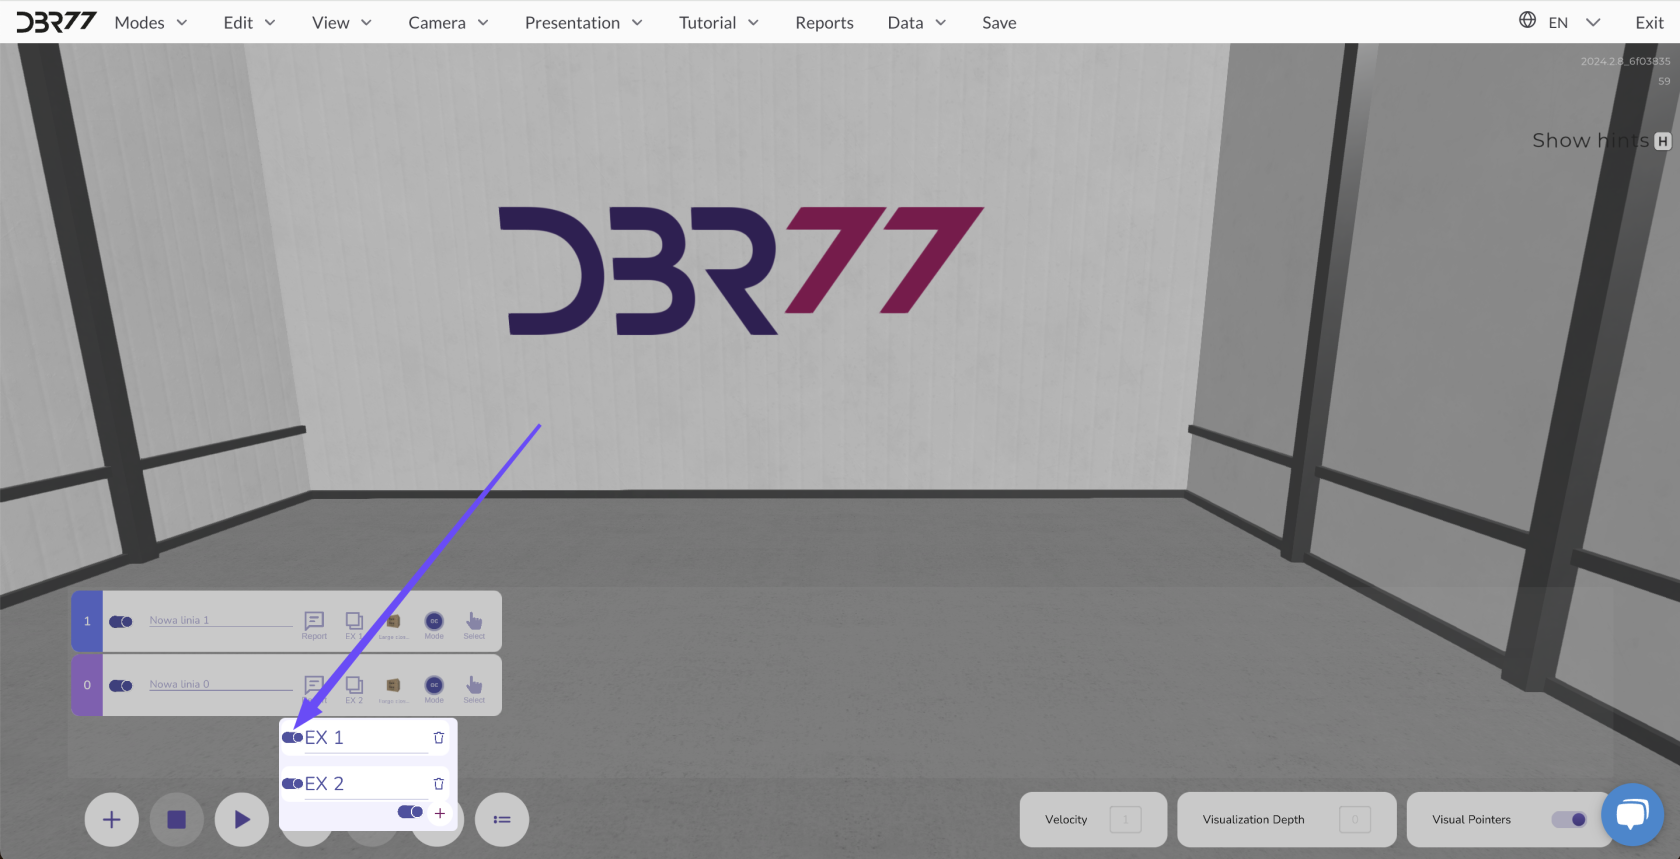
**Creating Filters:**
To create filter groups, switch to animation mode and click the fourth icon from the left in the bottom panel.
[](https://learn.dbr77.com/uploads/images/gallery/2024-09/GrebTRQSdbCRSS5b-image.png)
- You can then create a new filter group by entering the group name and confirming it.
[](https://learn.dbr77.com/uploads/images/gallery/2024-10/bEiYrvvgAelQfmul-image.png)
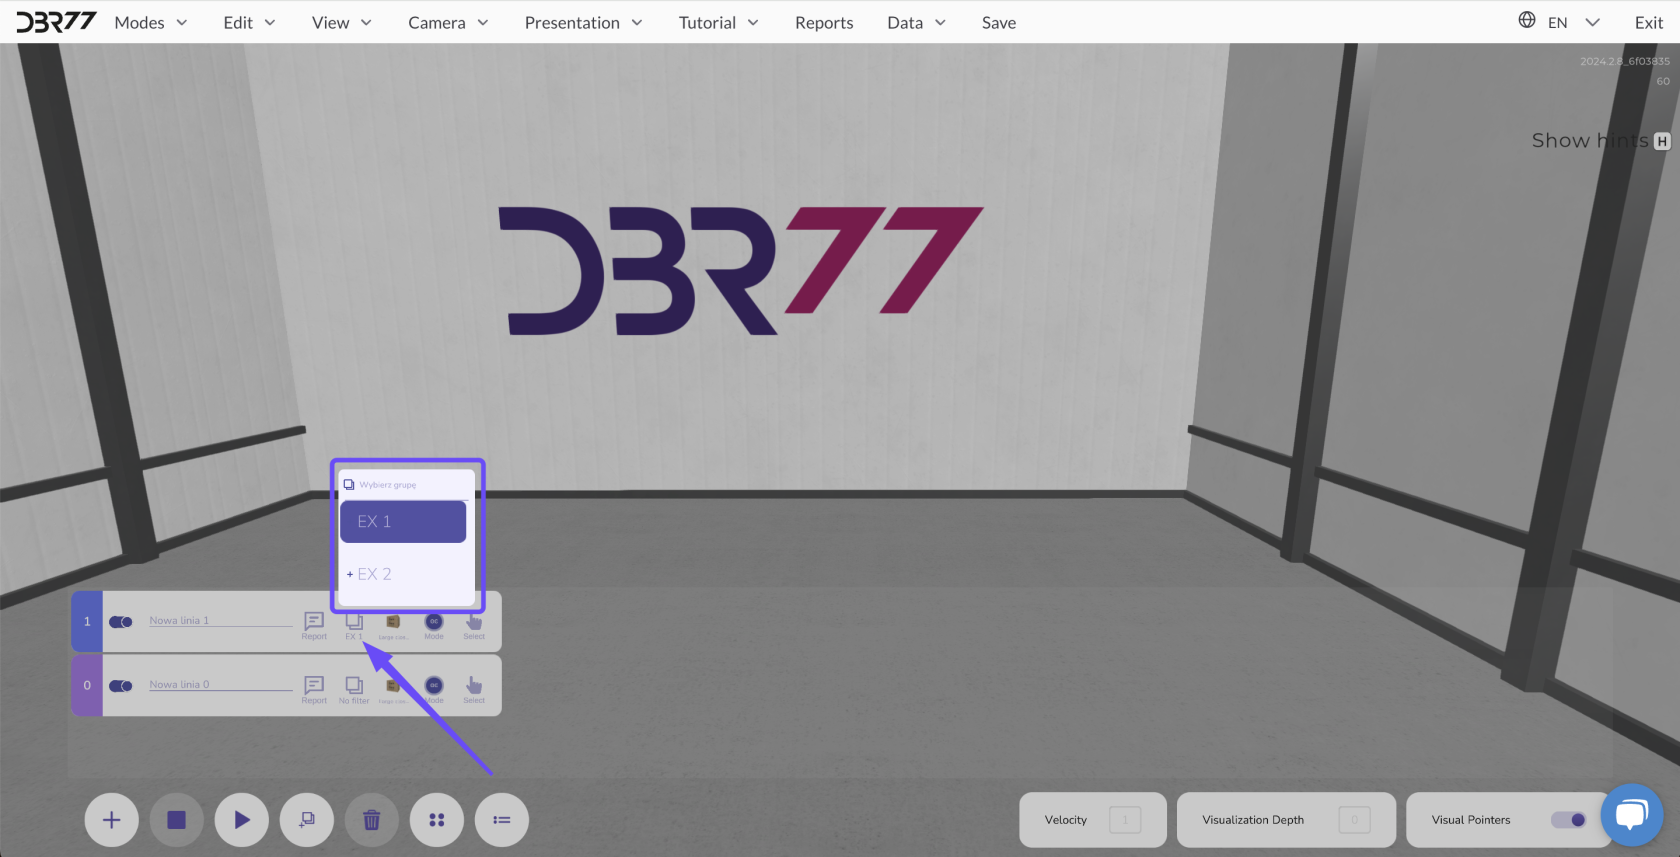
- After creating the group, assign individual animation lines to it. Select an animation line, right-click twice, and choose the option to assign it to the desired group.
[](https://learn.dbr77.com/uploads/images/gallery/2024-10/KDejWINSk8criuqv-image.png)
#### **Applying Filters:**
- To display only selected animation groups, toggle the filter view by clicking the desired group in the filter panel.
- This will display only the animation lines of the selected group on the screen, allowing you to focus specifically on this part of the project.
[](https://learn.dbr77.com/uploads/images/gallery/2024-10/h25jWKqfSEZdGzbf-image.png)
Filtering significantly streamlines work in complex projects, especially when dealing with numerous animation lines simultaneously.
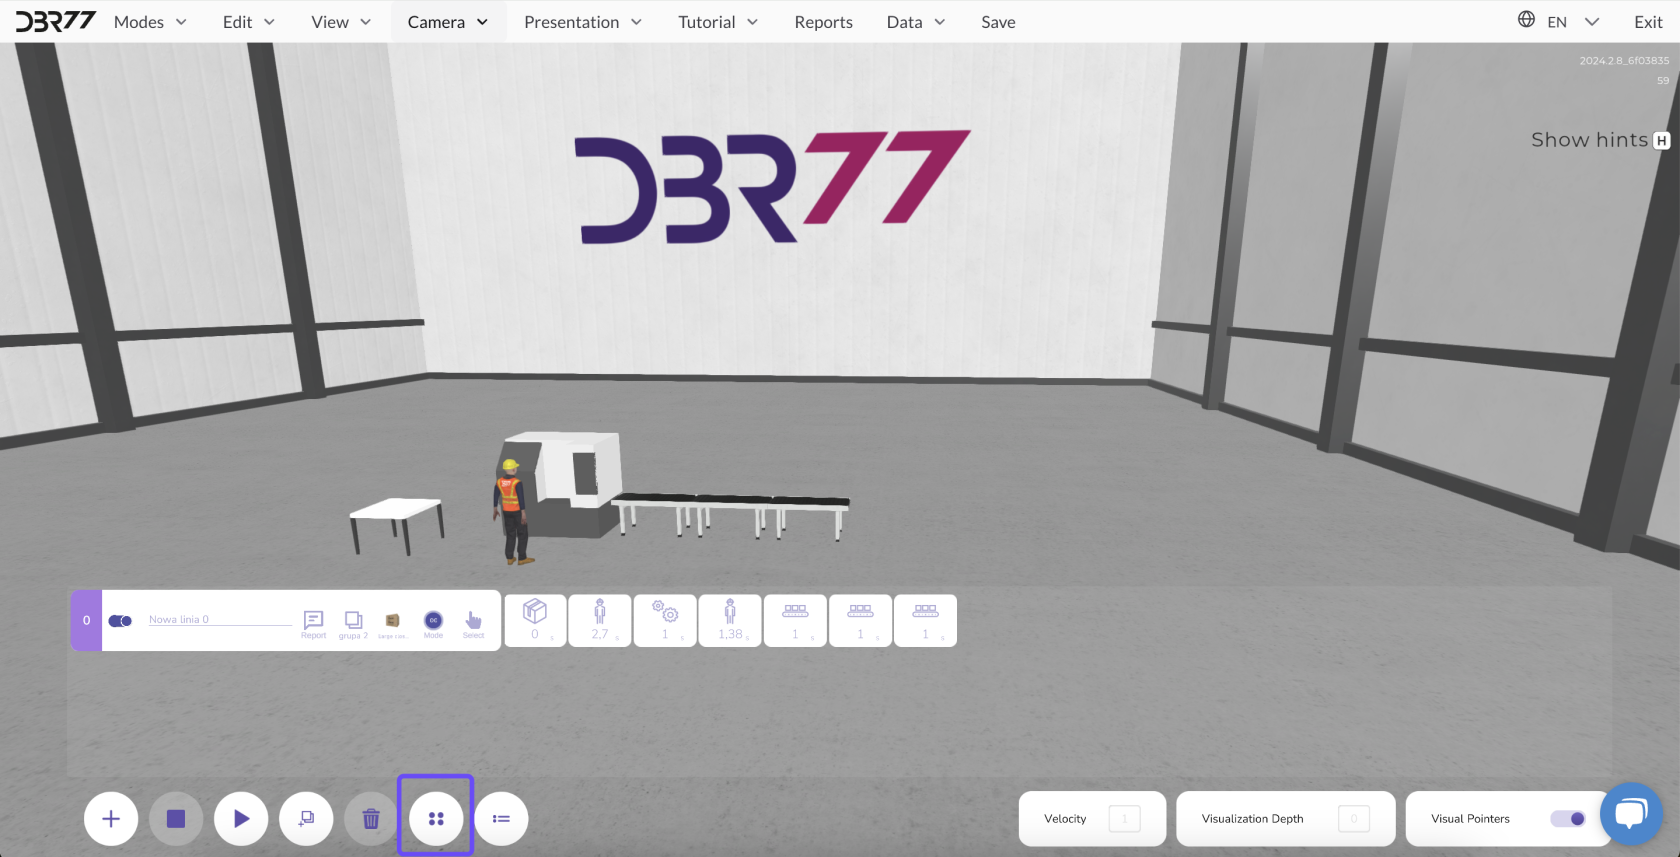
# How to Duplicate an Animation Line
Duplicating allows you to copy both the animation line and all associated elements created in the scene.
[](https://learn.dbr77.com/uploads/images/gallery/2024-09/LYLegnIN3Mlxy9Vw-image.png)
#### **How to Duplicate an Animation Line:**
1. Select the animation line you want to duplicate by clicking it in the list of animation lines.
2. Then, click the “Duplicate” button – the sixth button in the menu at the bottom left.
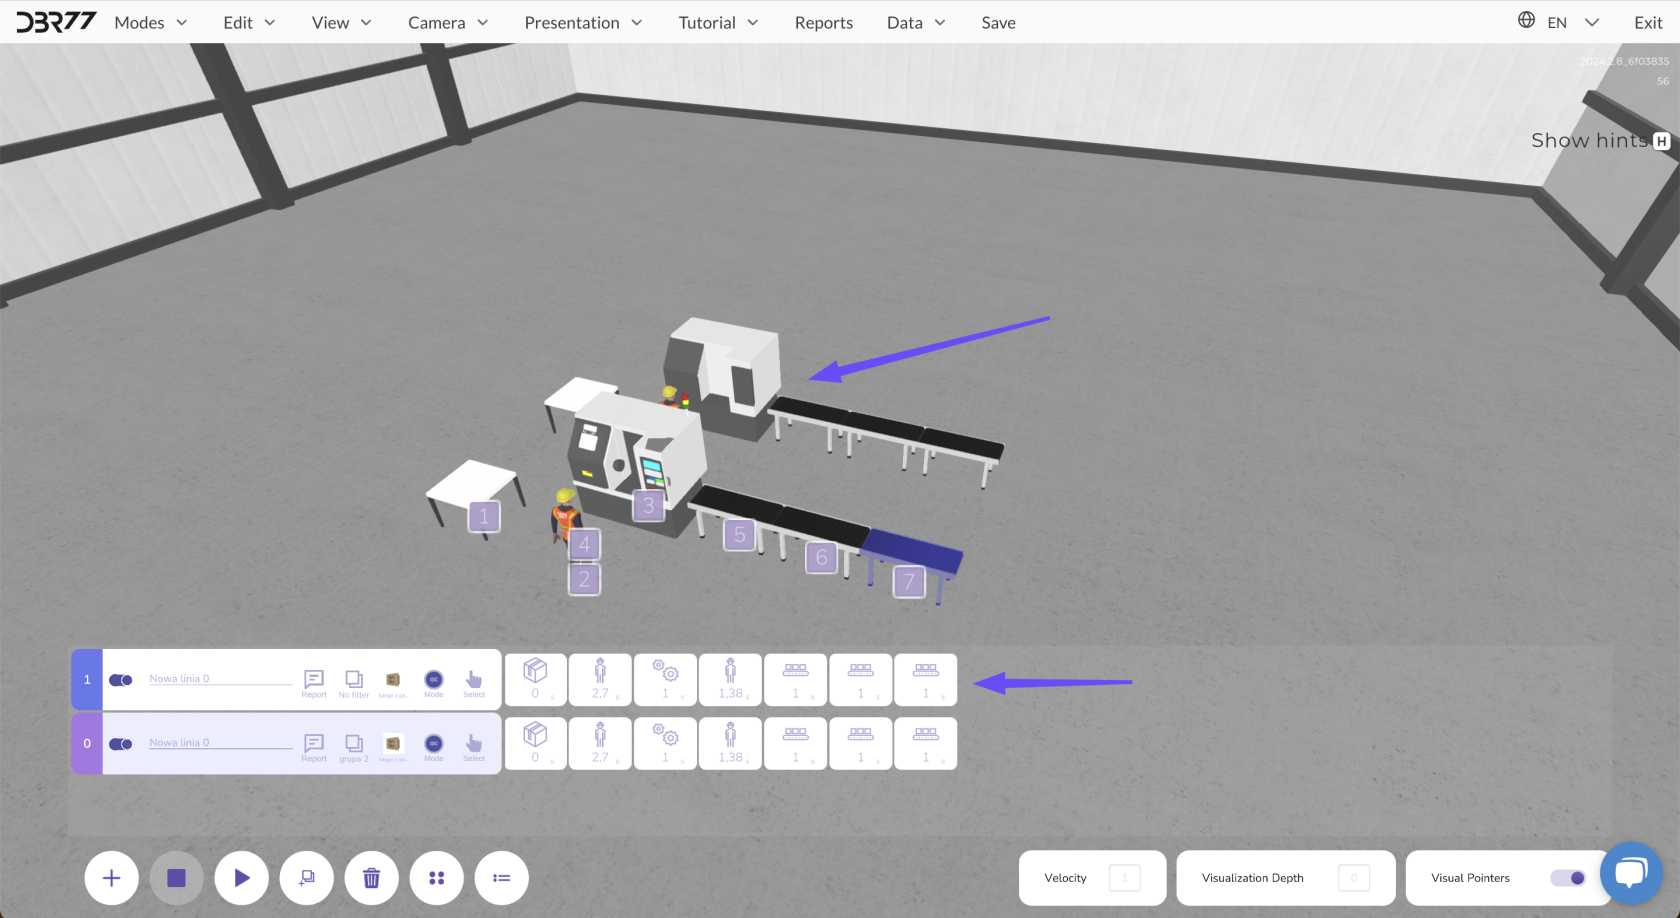
3. An exact copy of the selected line will appear in the scene, along with the associated animation line.
4. A new entry – the duplicate of the line – will be created in the list of animation lines. You can manage this copy just like the original.
[](https://learn.dbr77.com/uploads/images/gallery/2024-10/wIJlct1chkiMl8f7-image.png)
[](https://learn.dbr77.com/uploads/images/gallery/2024-09/dzlShZ0lxQK2koUu-gify2-25.gif)
Duplicating is a quick method for replicating entire animation sequences, speeding up work on projects that require many similar processes.
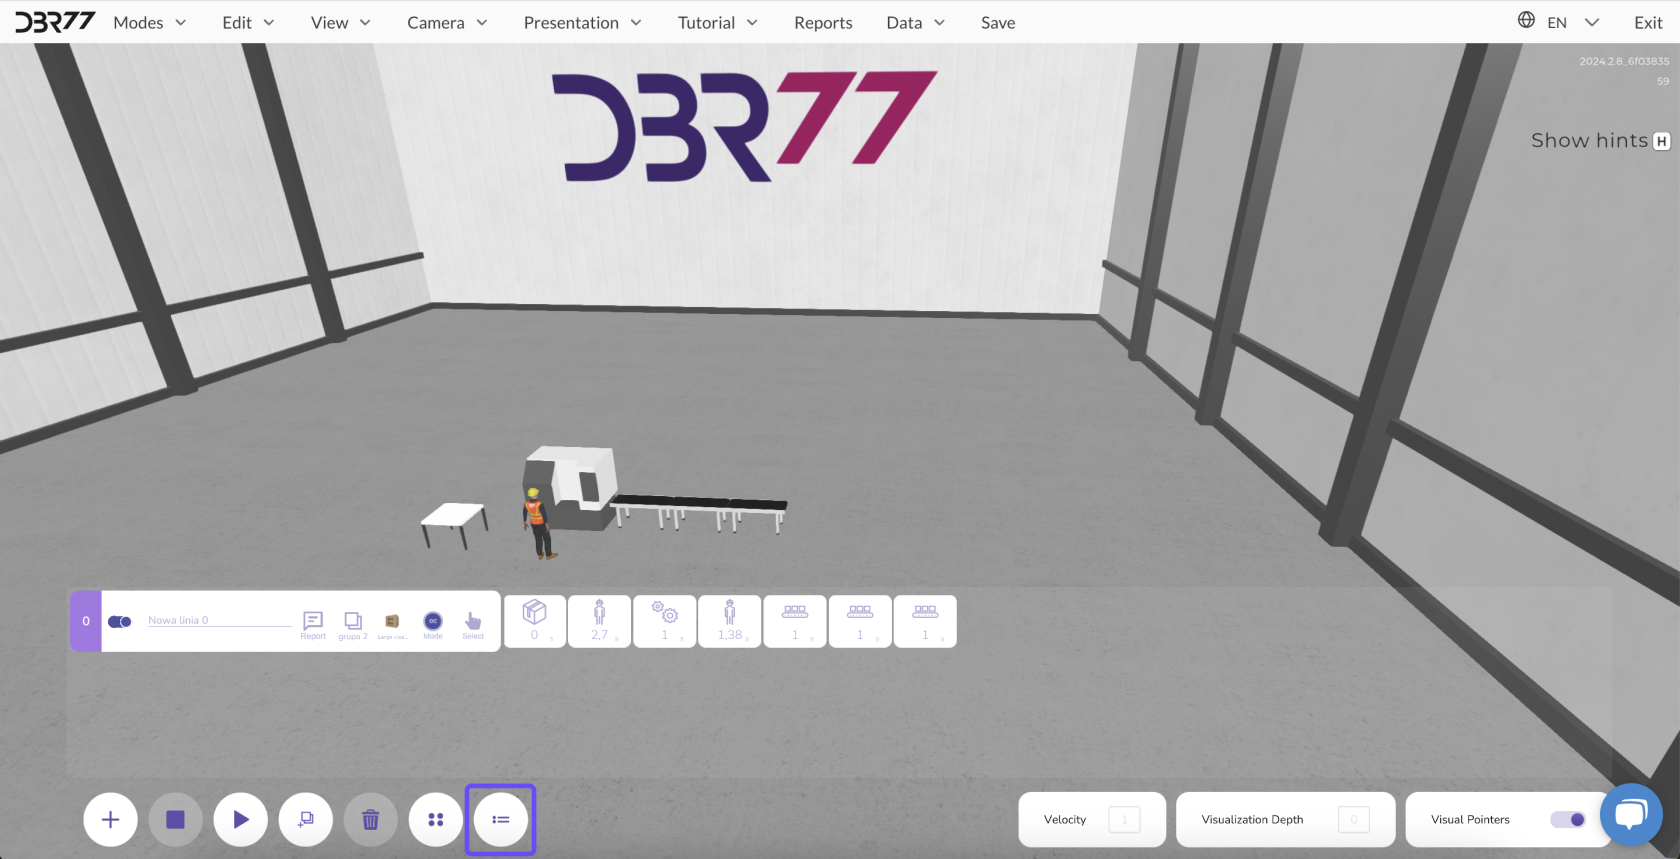
# How to Replicate an Animation Line
Replication is a feature that allows you to create an identical animation line without duplicating the physical line in the scene. This lets you develop different animation variants for the same line without rebuilding all the elements.
[](https://learn.dbr77.com/uploads/images/gallery/2024-09/RNURINWUCOqvotyd-image.png)
#### **How to Replicate an Animation Line:**
- Select the animation line for which you want to create an alternative.
- Click the “Replicate” button next to the animation line list.
- A new, identical animation line will appear in the list, based on the same physical line in the scene.
- You can now edit this new animation line and test various scenarios by enabling or disabling the animation lines as needed.
[](https://learn.dbr77.com/uploads/images/gallery/2024-10/dpEaopxcghXQtFLi-image.png)
[](https://learn.dbr77.com/uploads/images/gallery/2024-09/iRHYAqUTRCdpifTw-gify2-26.gif)
Replication enables testing of different process variations for the same line without creating new elements in the scene.
# Reports
In the **3D studio,** you can generate and view various reports that provide detailed insights into the performance of animation lines.
[](https://learn.dbr77.com/uploads/images/gallery/2024-09/GiZvSI9DJt0gJ4Od-image.png)
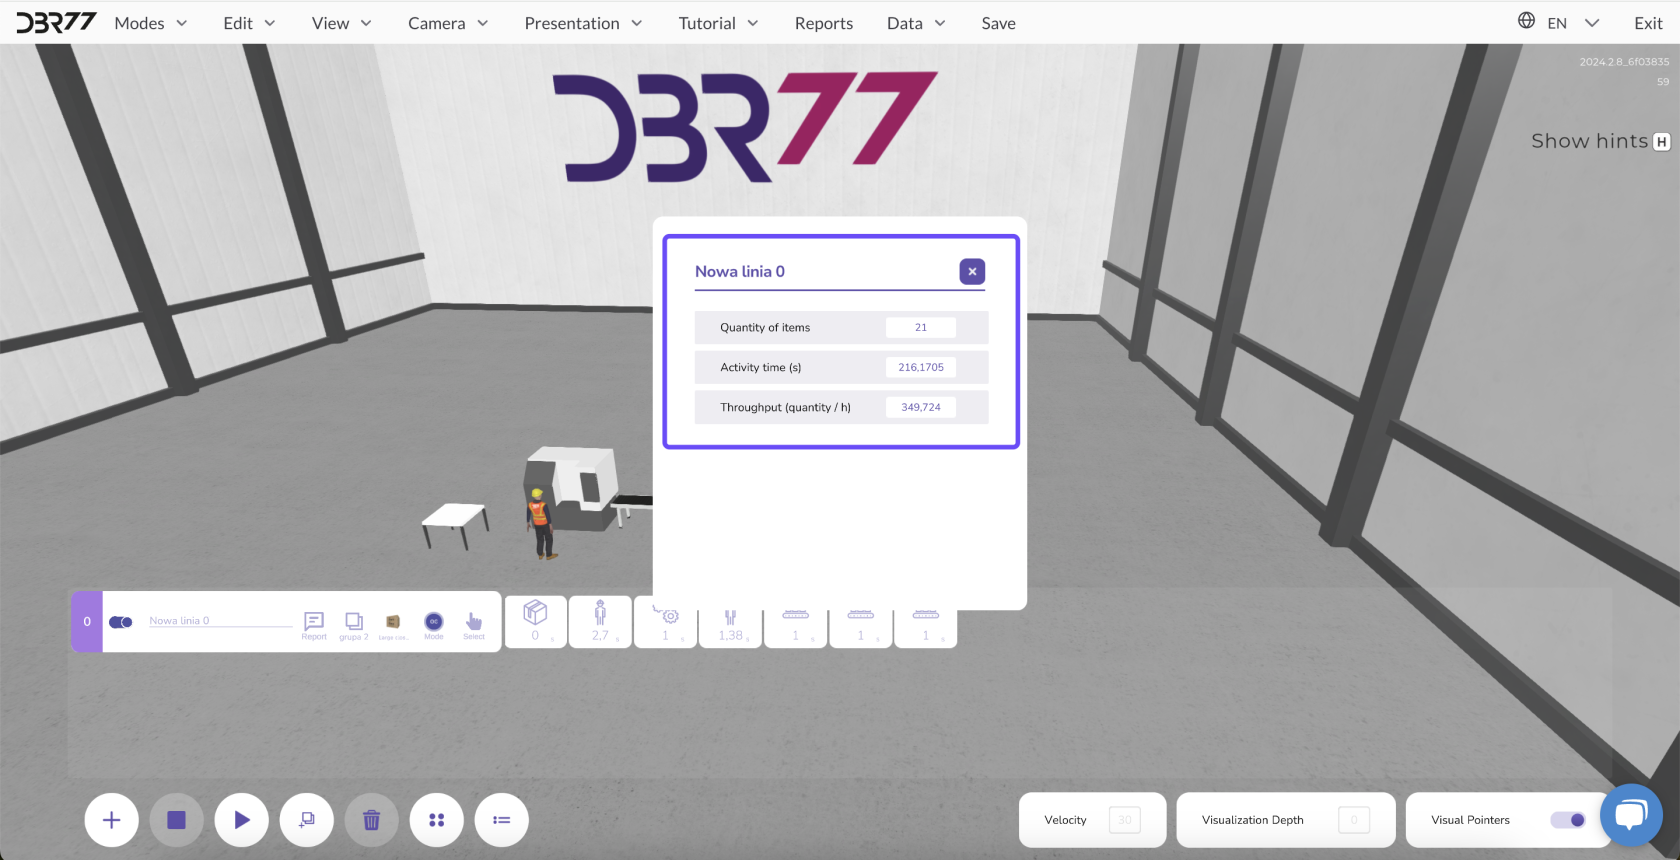
#### 1. **Data in the Animation Line Report:**
- **Number of Units:** Indicates the number of units produced during the current animation.
- **Activity Time:** Shows the duration for which the animation line was active.
- **Throughput:** Determines the efficiency of the animation line over a specific time period.
[](https://learn.dbr77.com/uploads/images/gallery/2024-09/TKV5WhClC7sflmzN-image.png)
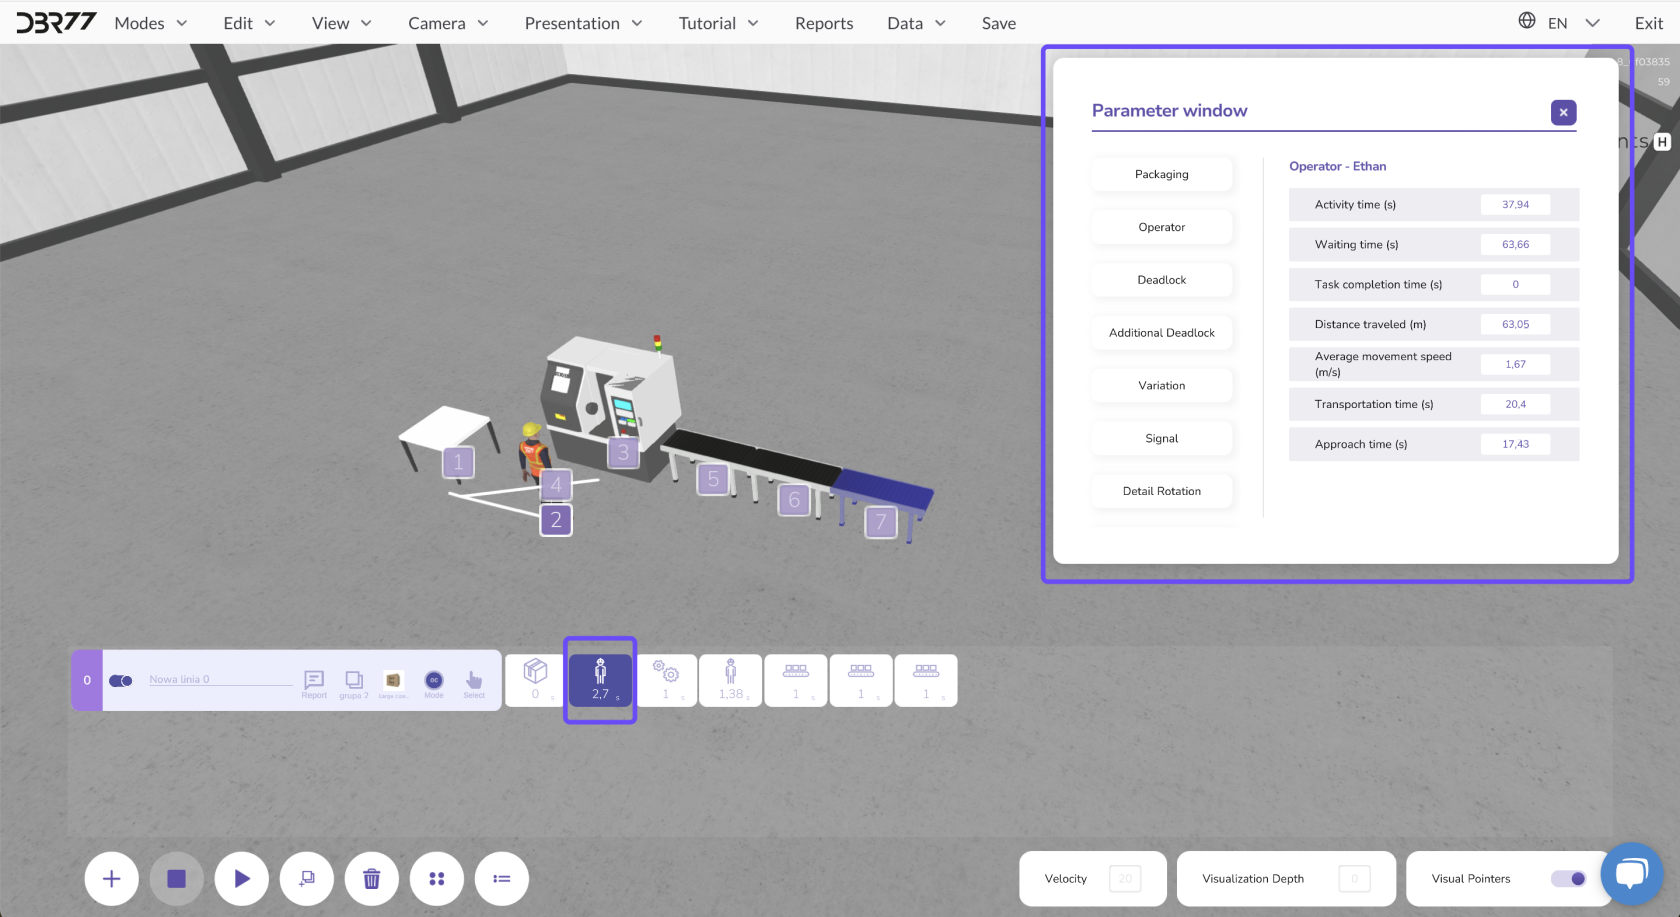
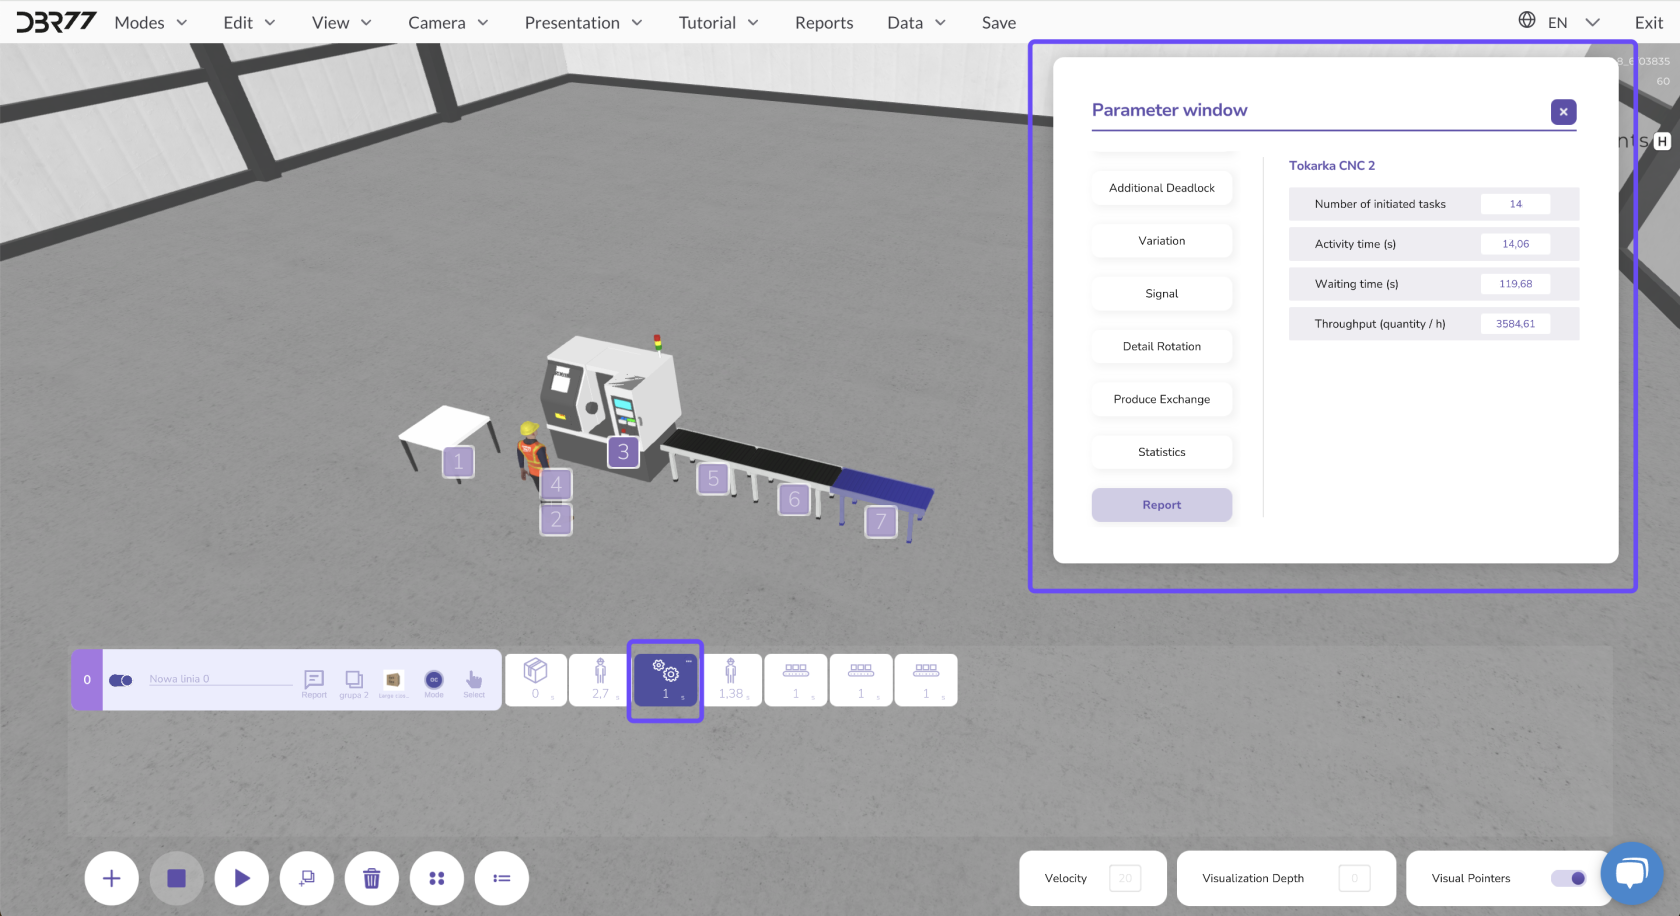
#### 2. **Reports for Each Animation Element:**
- To view a report for a specific animation element, click the corresponding field in the interface and select the "Statistics" or "Report" option.
- Reports can be accessed both during the animation and after it has stopped.
[](https://learn.dbr77.com/uploads/images/gallery/2024-10/OM1AQQ0ljFI51PhF-image.png)
[](https://learn.dbr77.com/uploads/images/gallery/2024-10/s8yOrebo6215wtgL-image.png)
[](https://learn.dbr77.com/uploads/images/gallery/2024-09/NLCq7X3WVm84iL2j-gify2-27.gif)
#### **Data in Reports Based on Object Category:**
- **For Operators:**
- Activity Time
- Wait Time
- Task Processing Time
- Distance Moved
- Average Movement Speed
- Transport Time
- Travel Time
- **For Machines and Robots:**
- Number of Operations Started
- Activity Time
- Wait Time
- Throughput
All reports generated within a scene are available in the main menu under the "Reports" tab.
[](https://learn.dbr77.com/uploads/images/gallery/2024-09/2pfQBHzfDMHx1udA-image.png)
[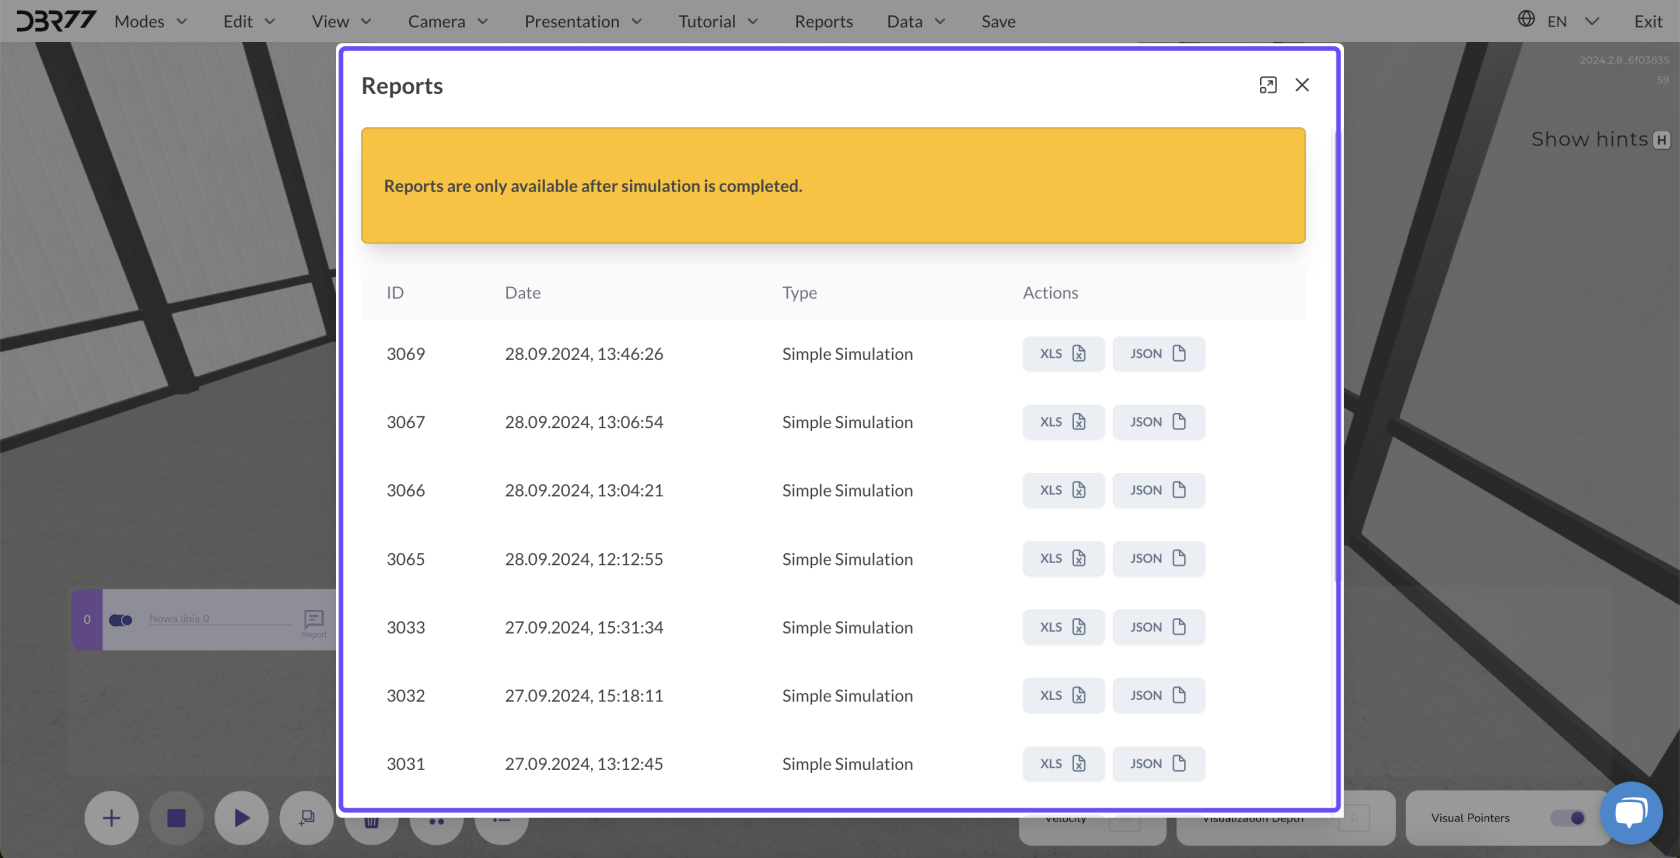](https://learn.dbr77.com/uploads/images/gallery/2024-09/Ktm6I5XRXrWiTiWo-image.png)
These detailed reports enable an analysis of production line performance and help identify areas for improvement. You can download the reports for manual analysis or using external tools, or utilize our AI assistant to analyze them and provide optimization suggestions.
# Start Methods
[](https://learn.dbr77.com/uploads/images/gallery/2024-09/P5NLjW9WCjoOZIMq-image.png)
In the 3D studio, there are several ways to start animation lines, customizable to meet production needs.
### **Here are the three main methods:**
**1. Immediate Start**
[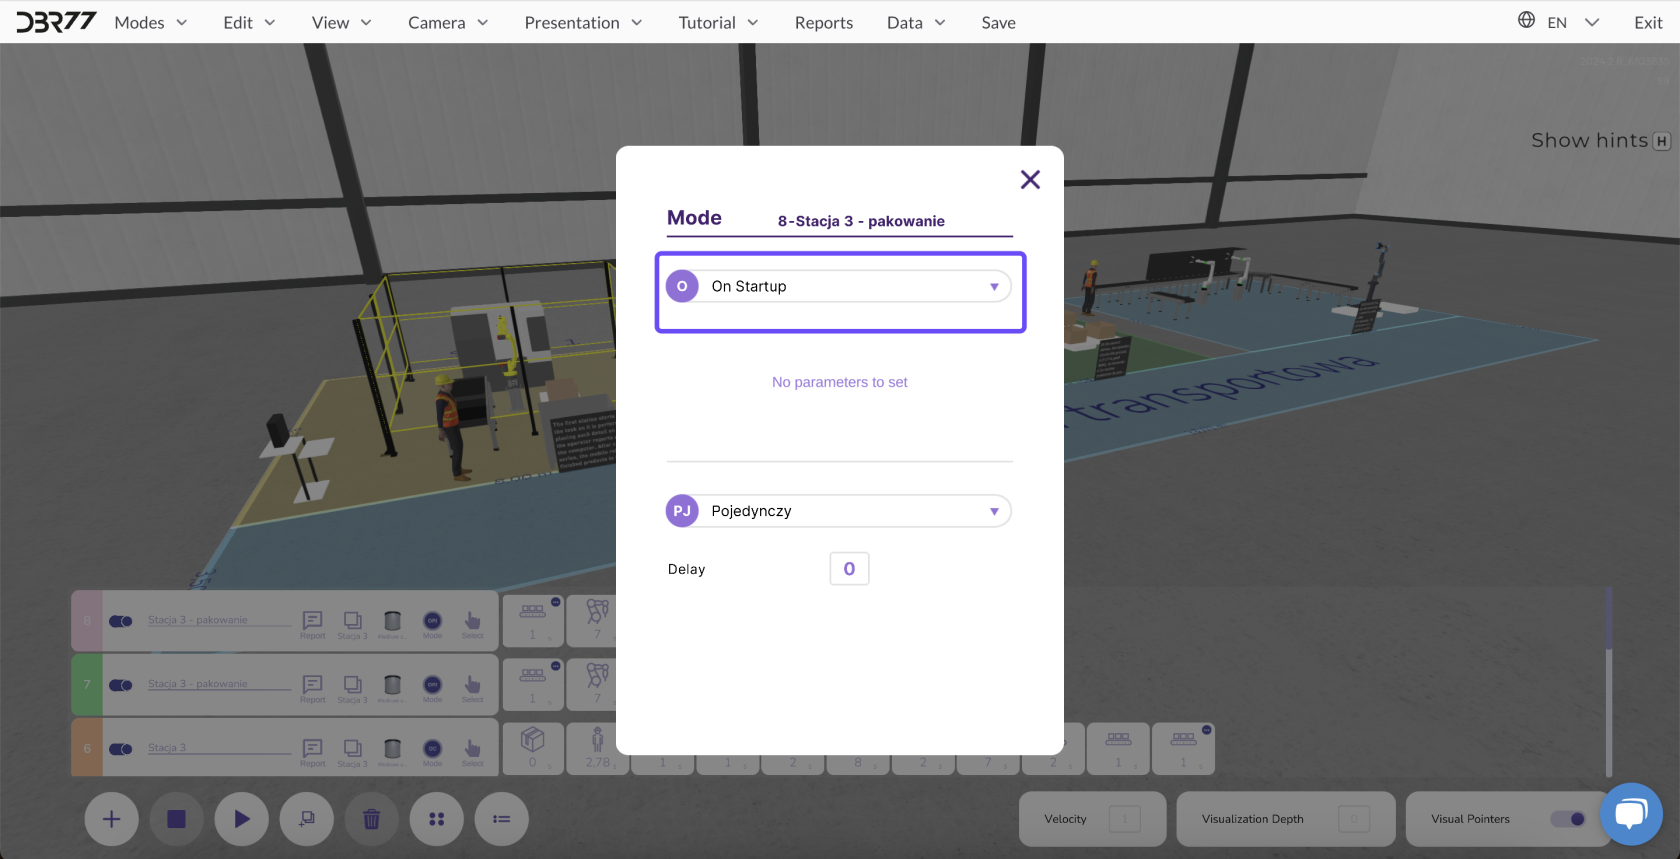](https://learn.dbr77.com/uploads/images/gallery/2024-09/RIrx0DH5LEo4AhJ8-image.png)
- **Description:** After clicking the "Play" button, the entire animation line starts immediately, and all elements begin executing their programmed tasks without delay.
---
#### **2. Event-Driven Start**
[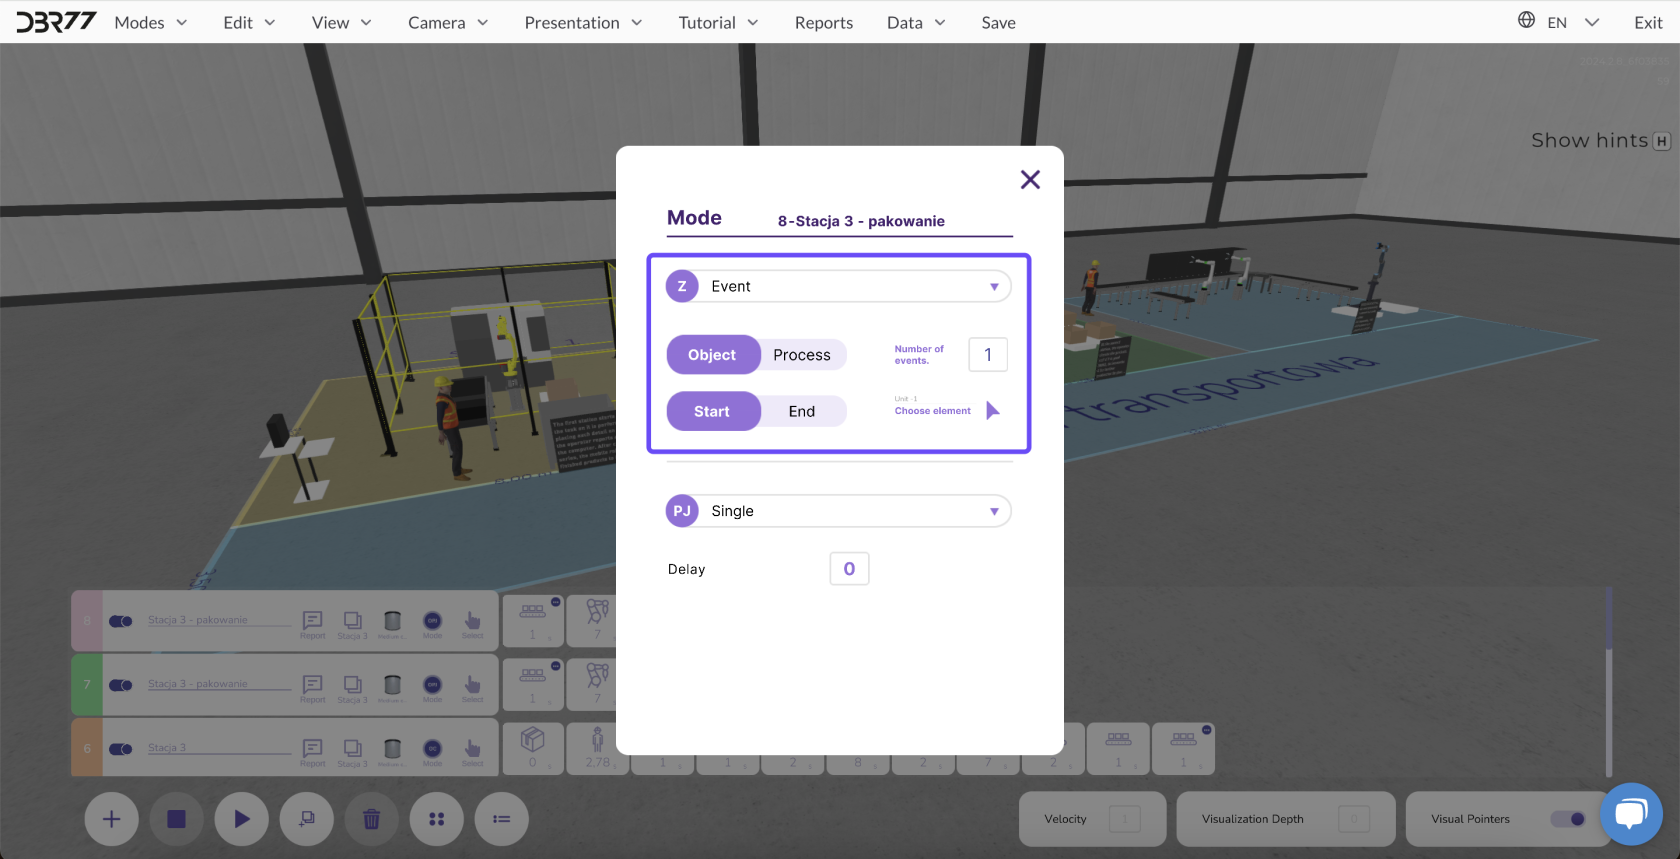](https://learn.dbr77.com/uploads/images/gallery/2024-09/uouC70N8jg4BCEeH-image.png)
**Description:** Events are conditions that define the start or end time of an object or process.
**Defining Events:**
- Select an element that controls the start or end of another object or process.
- Specify after how many events the selected animation line should start.
**Example:**
The next line starts only after the previous one has completed its tasks.
---
#### **3. Signal from a Specific Element**
[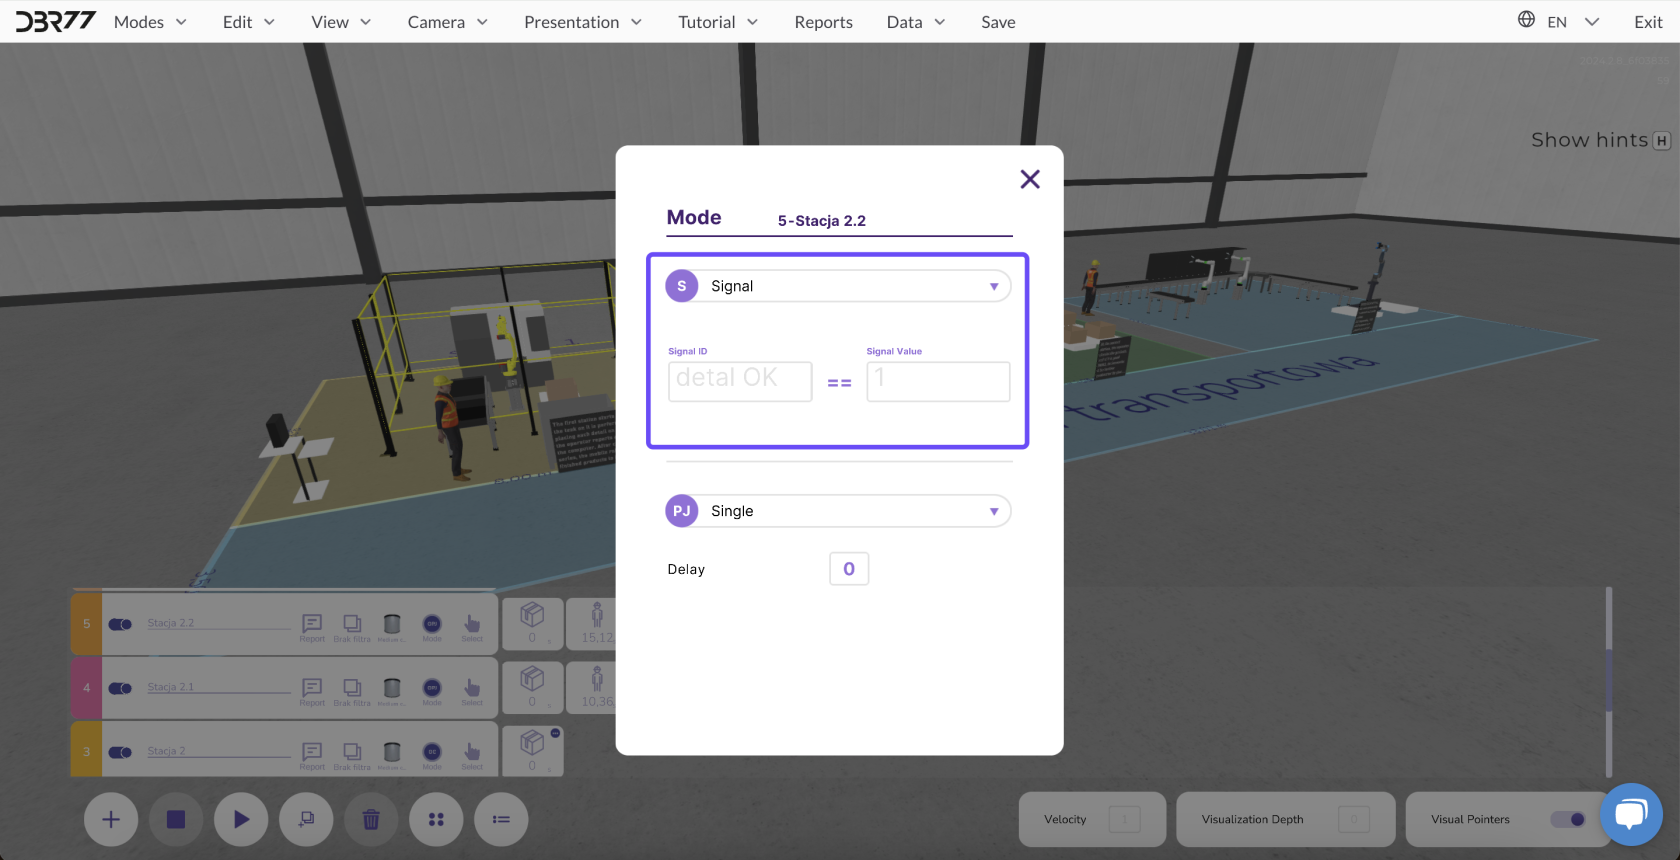](https://learn.dbr77.com/uploads/images/gallery/2024-09/ufGFV39wdynbnYKN-image.png)
- **Description:** Signals determine whether a specific element meets the conditions to activate the next animation line.
#### **Signal Functionality:**
- **Example:** In a quality control system:
- If an element passes inspection ("OK"), a signal with a value of 1 is sent, activating the next line.
- If an element fails inspection ("Defective"), a signal with a value of 0 is sent, blocking the next line. The defective element is redirected elsewhere instead of being further processed.
#### **Defining Probabilities:**
- Specify how often a certain signal should occur.
- Example: Set a 75% probability for elements passing and 25% for defects to control the production process more effectively.
[](https://learn.dbr77.com/uploads/images/gallery/2024-09/rmVgftYxvuHK44al-image.png)
### **Summary**
Each method allows for flexible control of animation lines in the 3D studio, enabling you to optimize workflows to meet the specific requirements of your production process.
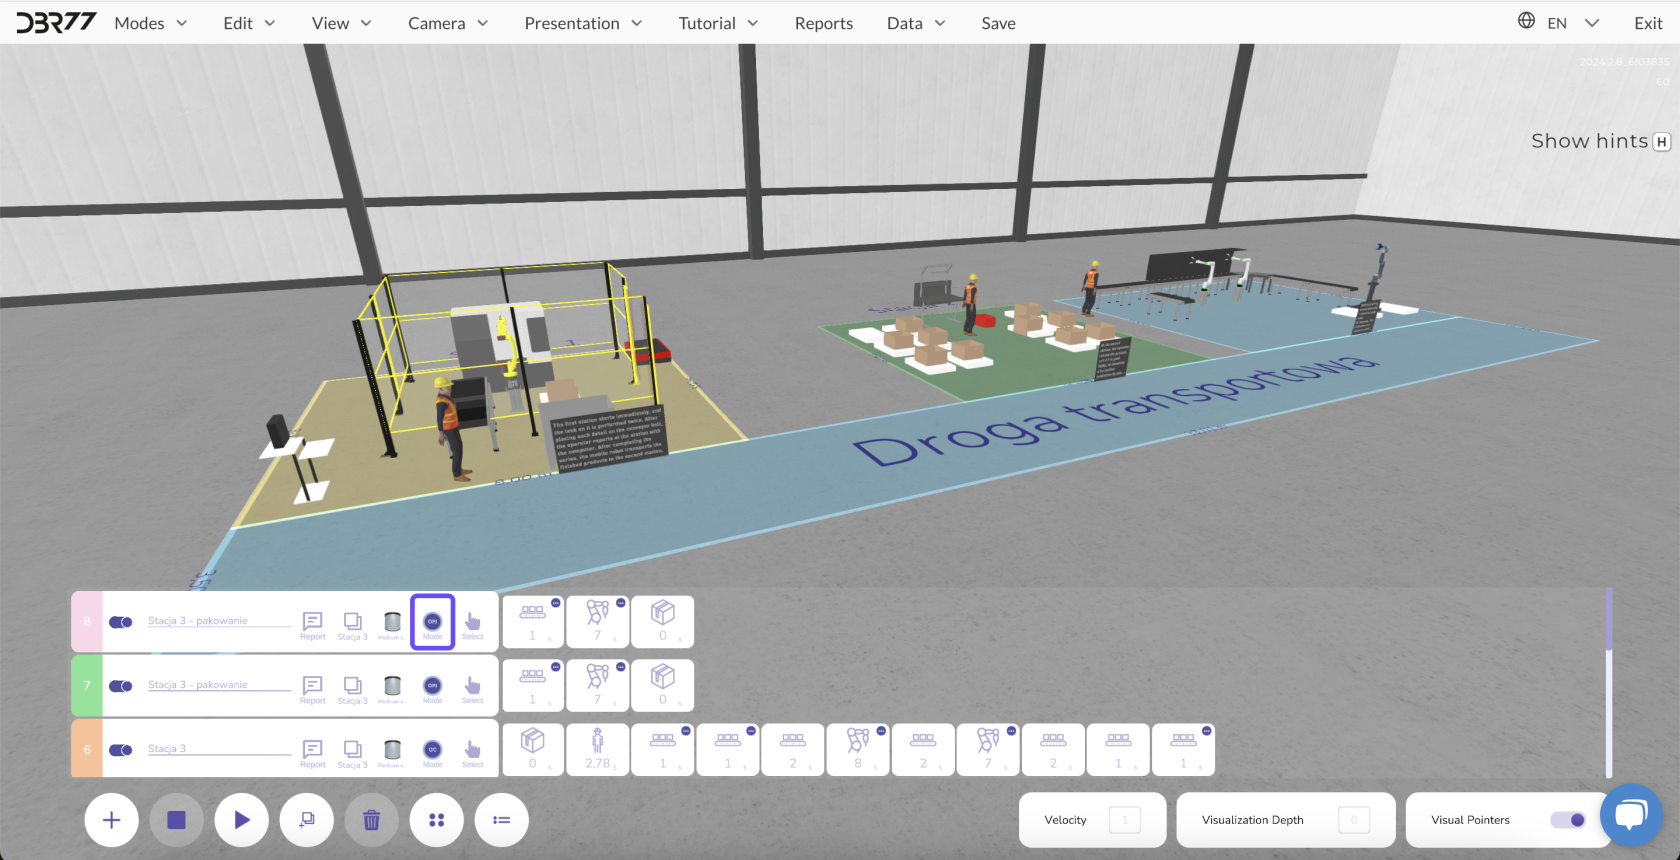
# Animation Modes
In the **3D Studio**, you can choose from various operating modes to tailor the animation to the specific production requirements. Here are the four main modes you can use:
[](https://learn.dbr77.com/uploads/images/gallery/2024-09/P5NLjW9WCjoOZIMq-image.png)
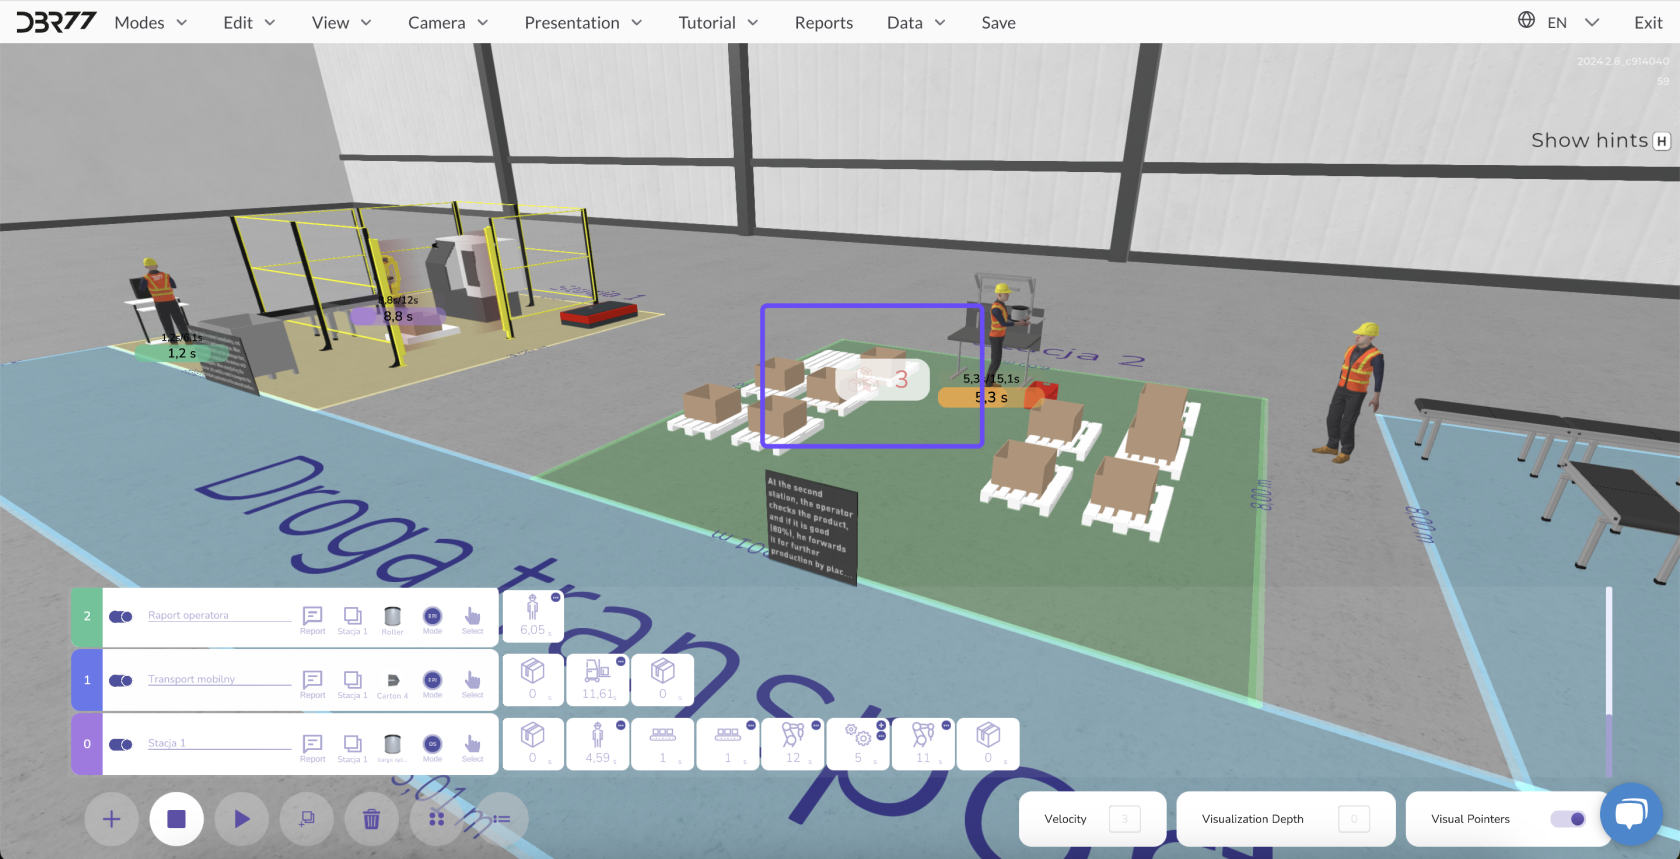
#### **Cycle Mode Description:**
- In this mode, the animation repeats every X seconds, starting a new process on the line even if the previous one has not yet finished. You can also set a delay.
If the previous cycle is still running when a new one begins, this is indicated by a symbol for object accumulation.
[](https://learn.dbr77.com/uploads/images/gallery/2024-10/3xEcf6RRoeVqZ0OQ-image.png)
#### Application:
- This mode is ideal for consistent and repeatable process sequences.
- It enables seamless continuation of work on the line without interruptions.
[](https://learn.dbr77.com/uploads/images/gallery/2024-09/DOSm5GbjrouxZ5Gv-image.png)
#### 2. Repeat Mode
- **Description:** The animation repeats every X seconds, but only if the previous process on the line has been completed. You can also set a start delay here.
- **Application:**
- Perfect for processes that need to be repeated regularly.
- Each new process begins at a defined time interval, supporting production planning.
[](https://learn.dbr77.com/uploads/images/gallery/2024-09/1NpZ9ERRMG1d3QS7-image.png)
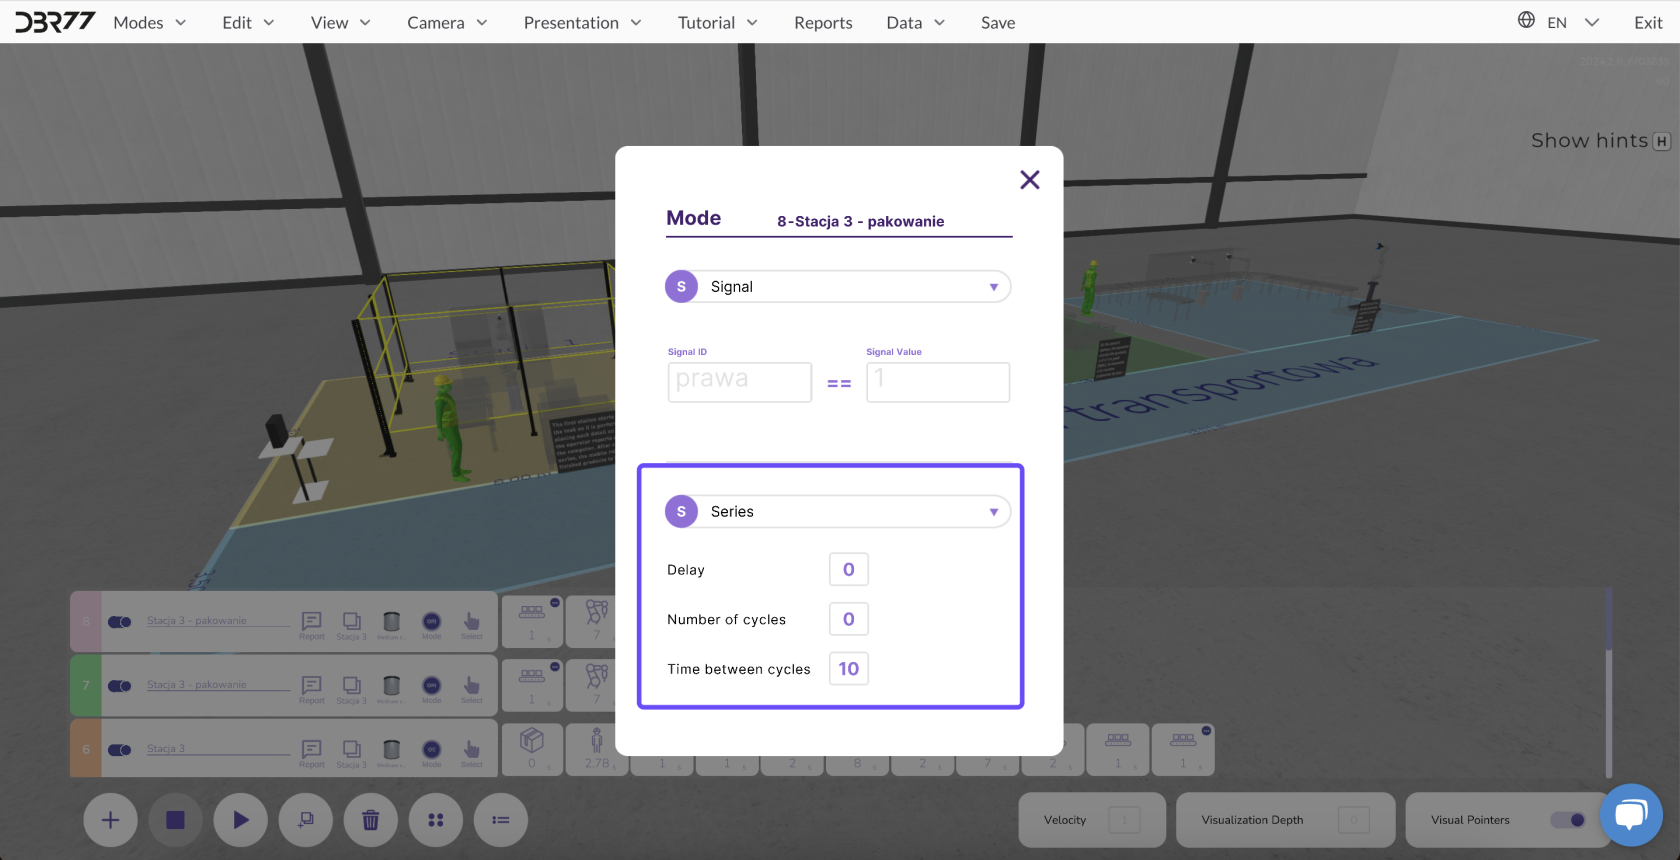
#### 3. Batch Mode
- **Description:** The animation repeats X times at intervals of Y seconds, after the previous process on the line has started.
- **Application:**
- Ideal for configuring a sequence of operations that require a specific number of repetitions within a defined timeframe.
- Perfect for task-based animations where a set number of products need to be produced.
[](https://learn.dbr77.com/uploads/images/gallery/2024-09/J6f2mAznxobBLpsV-image.png)
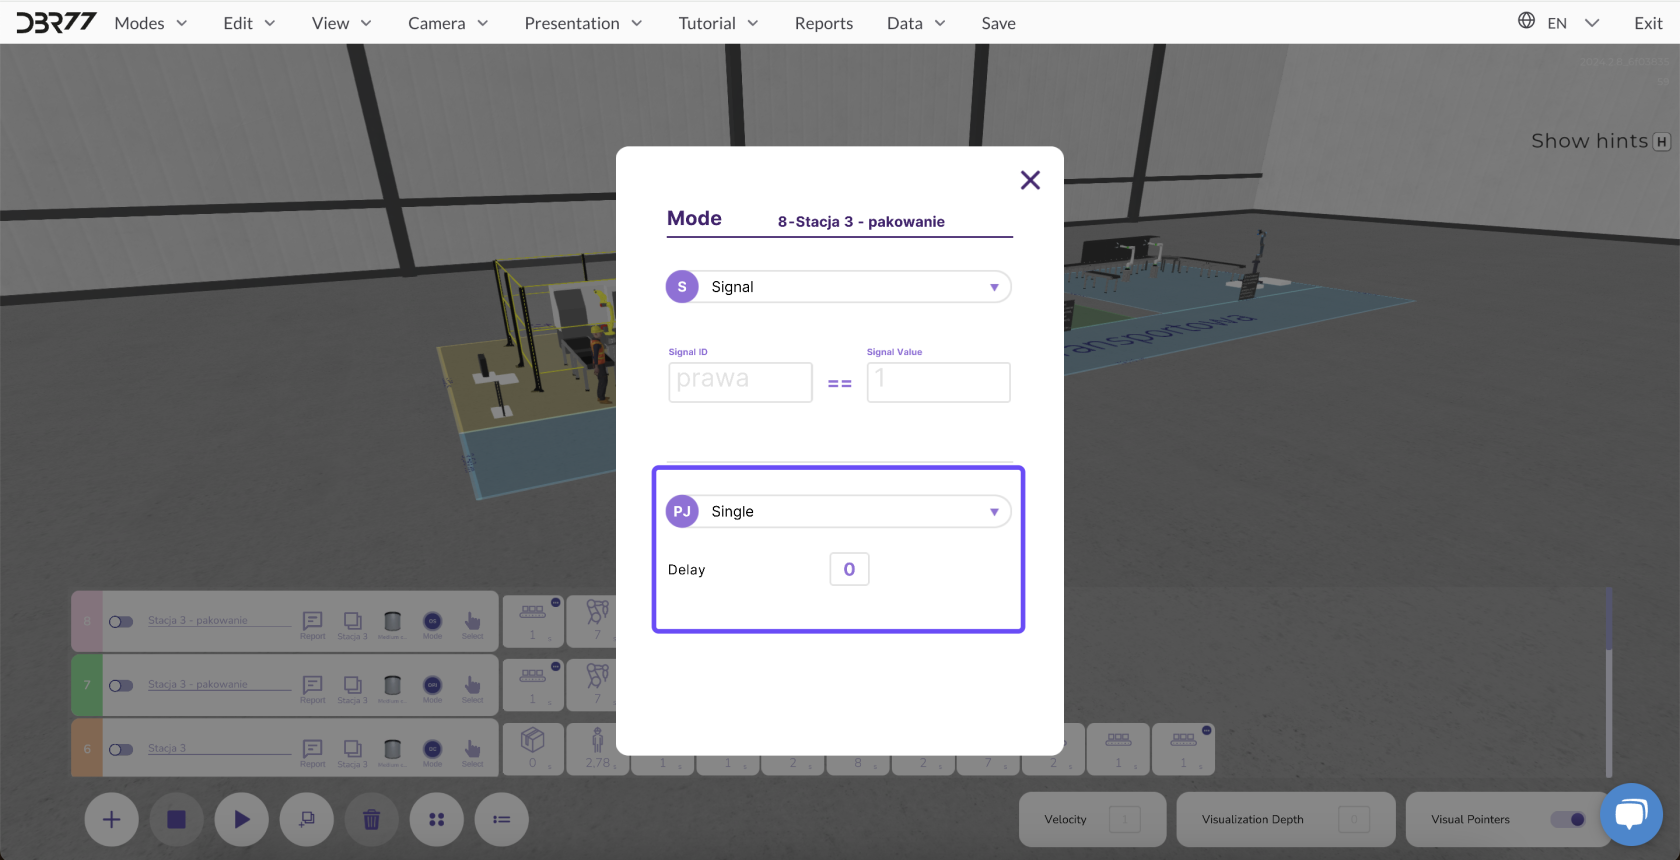
#### 4. Single Mode
- **Description:** The animation is started only once.
- **Application:**
- Suitable for one-time activation of the line, for example, in response to a signal from another animation line.
- Allows execution of a specific action without repetition.
[](https://learn.dbr77.com/uploads/images/gallery/2024-09/Y8tlSAgivcs9KgkV-image.png)
#### **Summary**
Selecting the appropriate animation mode enables precise customization of the production process to specific requirements. Thanks to the flexibility of these modes, you can easily manage time, repeatability, and action sequences within the animation.
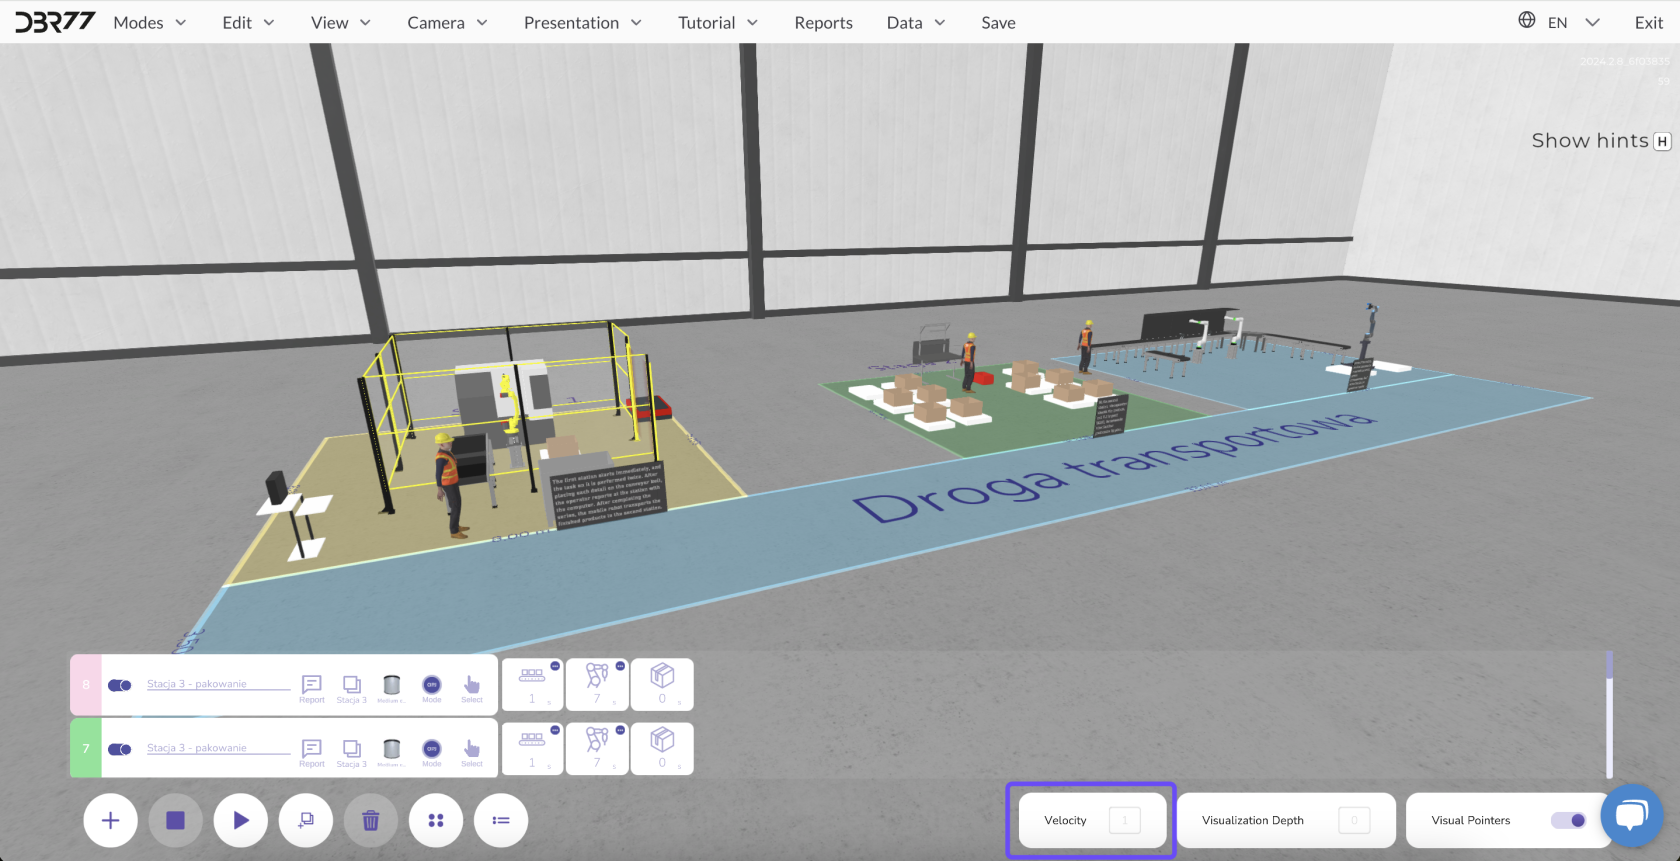
# Speed
In the 3D Studio, you can speed up the animation to quickly obtain results for your developed solution.
#### **How to speed up the animation:**
- Enter the value indicating how many times the animation should be accelerated.
- Once the value is entered, the animation will run at the new speed.
[](https://learn.dbr77.com/uploads/images/gallery/2024-09/UrE6WFdEtwppm5gx-image.png)
#### **Notes:**
- **Visualization:**
High acceleration values may limit the ability to accurately track all movements of the animation elements.
Some details may become invisible at higher speeds.
- **Reports:**
Despite limited visualization, all process data (e.g., number of units produced, operating time, throughput) is recorded and available in reports.
[](https://learn.dbr77.com/uploads/images/gallery/2024-09/DUMaN9mD120Kgjxi-gify2-28.gif)
**Speeding up the animation** is an excellent tool for quickly testing various scenarios and reviewing their outcomes in a short period.
#### **Important!**
To stop the animation after a specific time, use "T" on the keyboard to set the timer. After the designated time, the animation will automatically stop, and a report for that exact period can be generated in the "Reports" submenu.
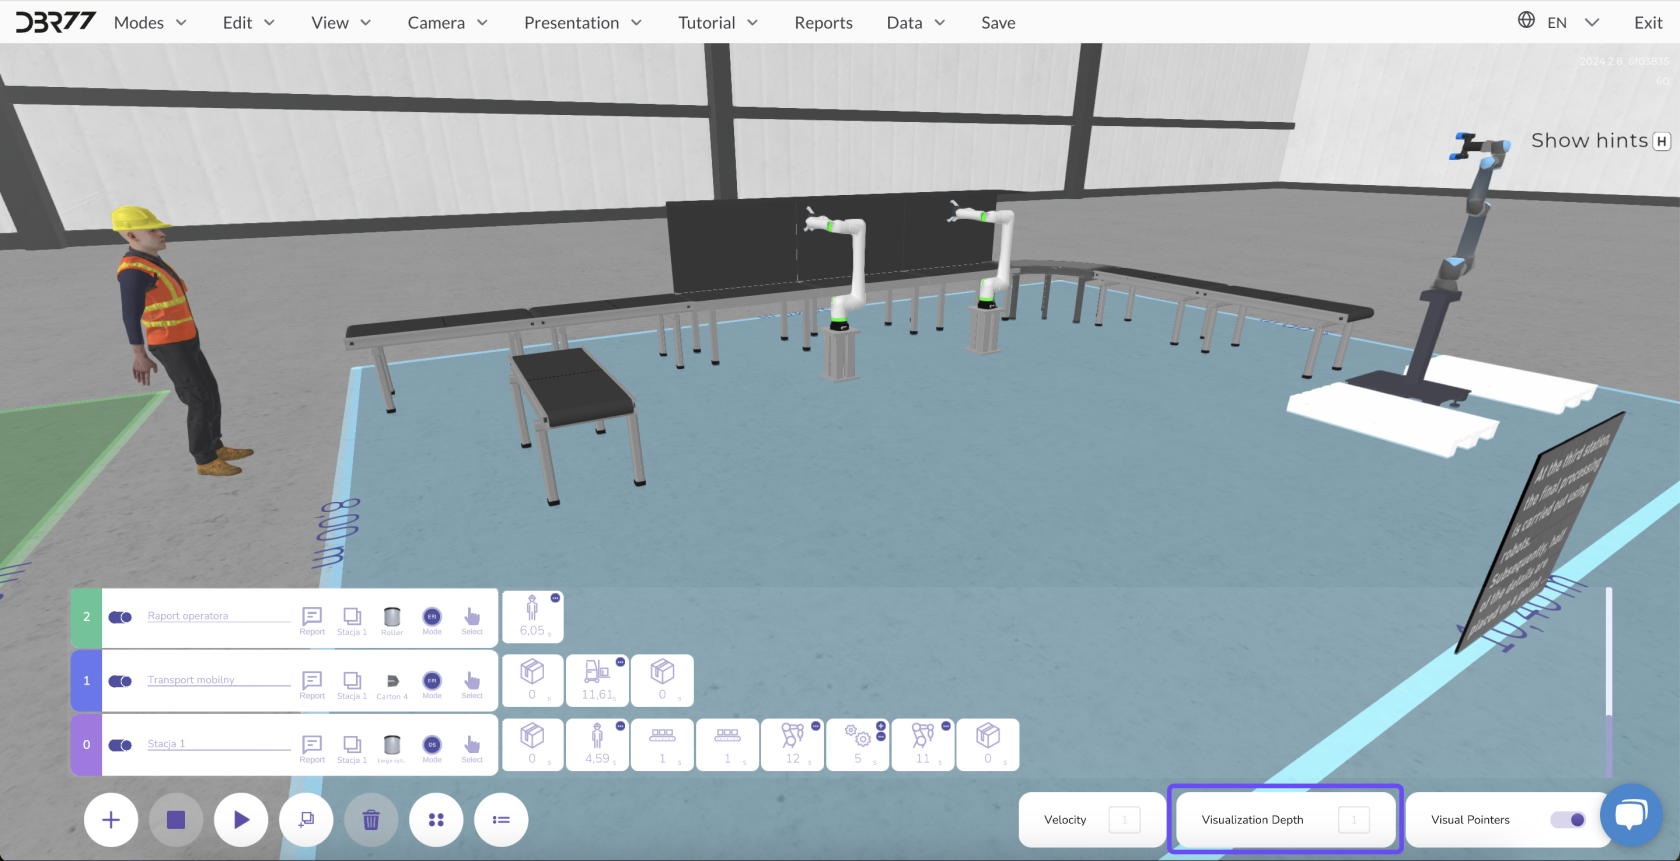
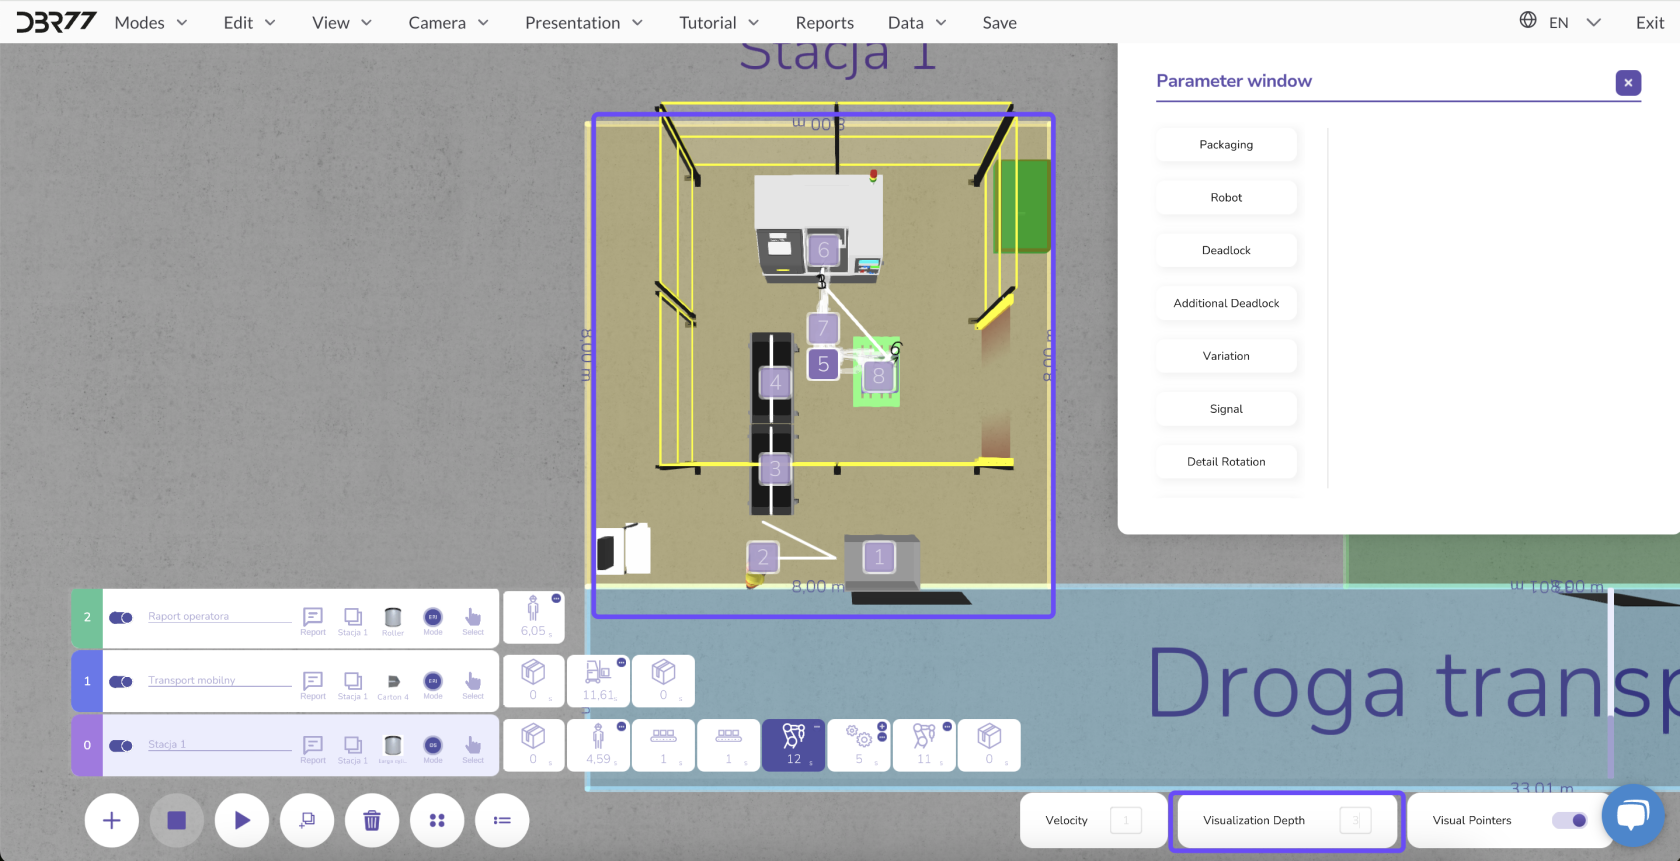
# The Depth of Visualization
The Depth of Visualization allows you to control how many elements in the scene, along with their motion paths, are highlighted in relation to the currently selected element.
[](https://learn.dbr77.com/uploads/images/gallery/2024-09/nSJltHyKH8XWIKBq-image.png)
**How Depth of Visualization Works:**
- Entering a **value of "0"**: Only the motion path of the currently selected element is highlighted.
- Entering a **value greater than "0"**: For example, with a value of "2," two motion paths of elements before and two paths of elements after the selected object are highlighted.
[](https://learn.dbr77.com/uploads/images/gallery/2024-10/eL8ZAvtc9Mzb8quB-image.png)
[](https://learn.dbr77.com/uploads/images/gallery/2024-10/LFWkRMv0a6a2Hll5-image.png)
#### **Functionality:**
- **Precise Control:** Enables tracking of the selected element and its dependencies on other elements in the scene that influence it or depend on it.
- **Simplified Planning:** By analyzing movements in relation to other objects, you can better understand how elements in the scene work together.
This feature is particularly useful for analyzing complex processes where the interaction of various elements plays a critical role.
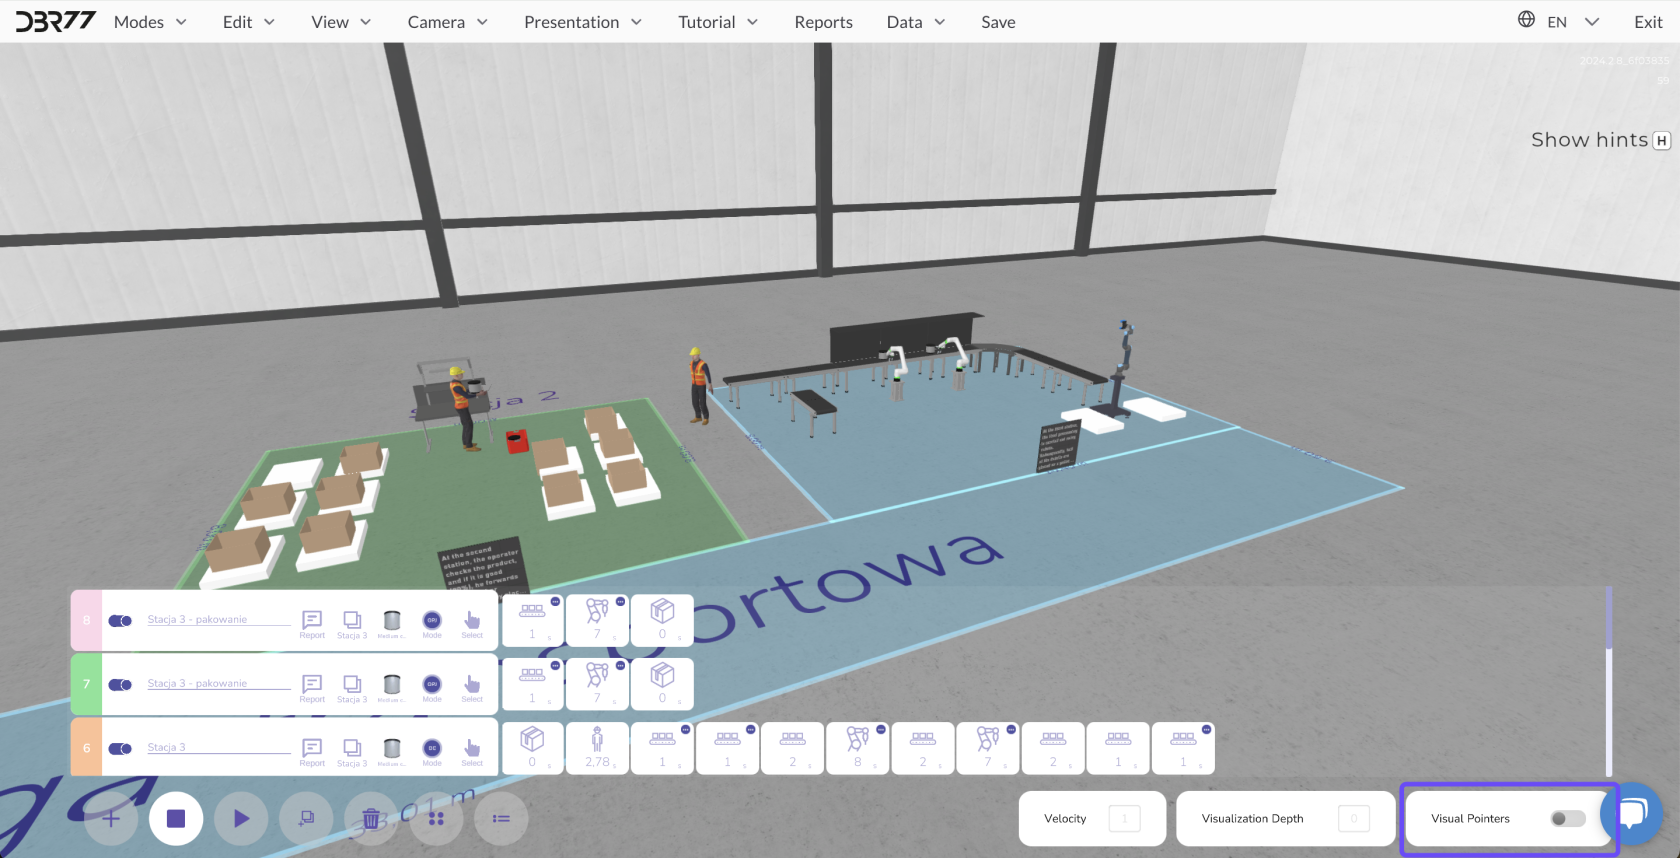
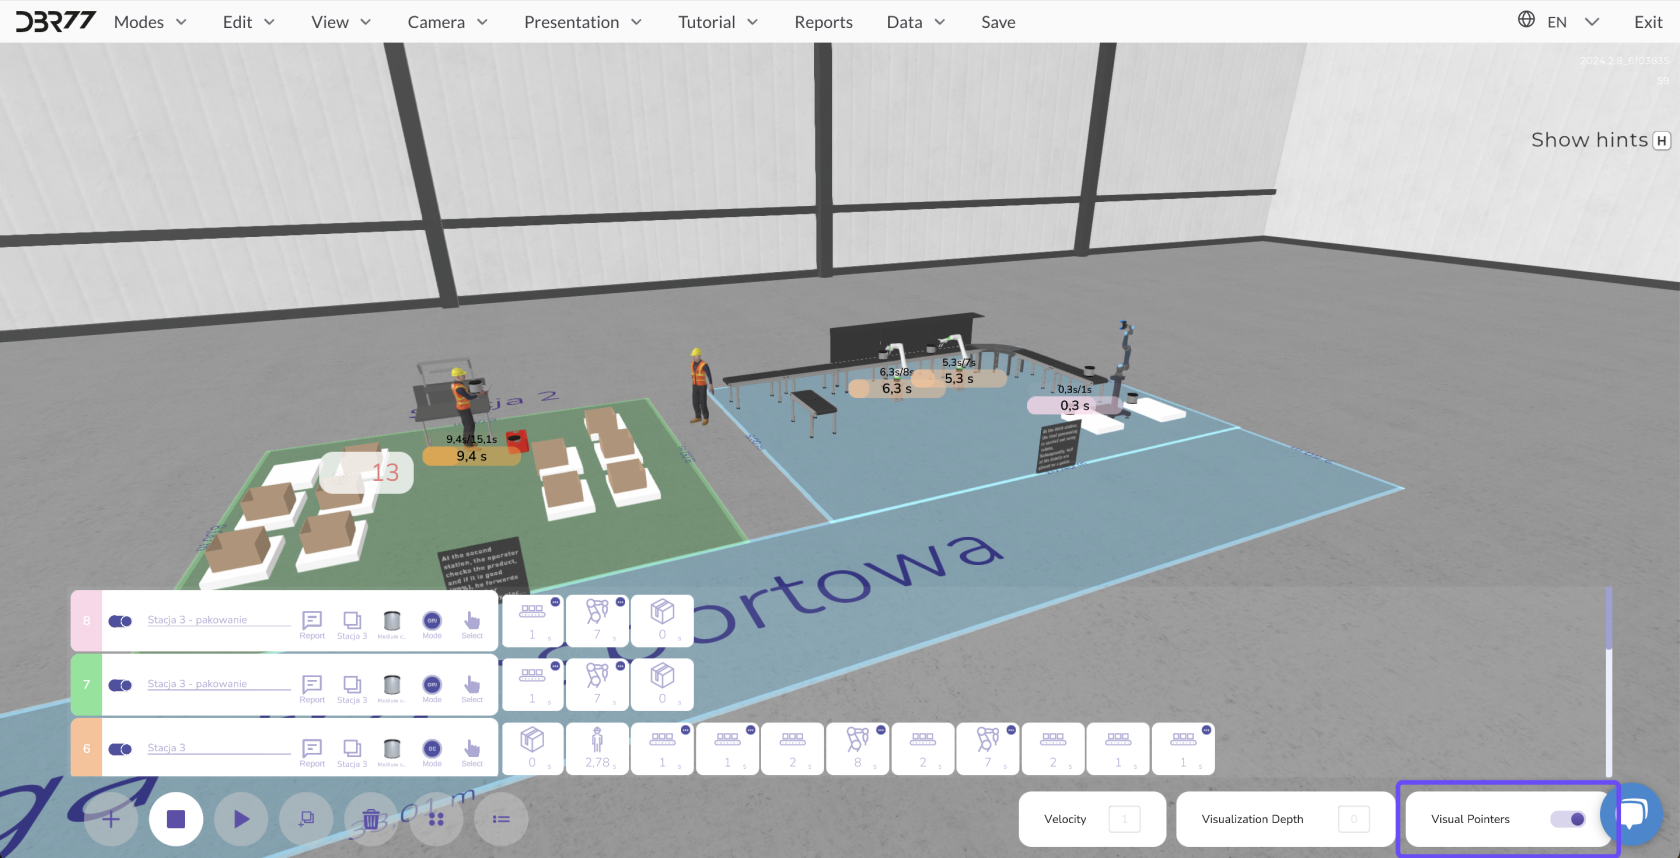
# Visual Indicators
Visual indicators are a tool that display the progress of the animation in real-time and provide information about process downtimes. They can be toggled on or off as needed to gain a comprehensive overview of the animation flow.
[](https://learn.dbr77.com/uploads/images/gallery/2024-09/4jcfnhl8l1b8SjPv-image.png)
#### [](https://learn.dbr77.com/uploads/images/gallery/2024-09/2ZruYMzFYhiL69kg-image.png)
#### **How Visual Indicators Work:**
- **Progress Tracking:**
Indicators visualize the current status of individual animation elements, allowing you to monitor the process flow in real-time.
- **Downtime Information:**
In cases of process disruptions, indicators highlight downtimes or delays, enabling quick analysis and facilitating improvements to the animation scenario.
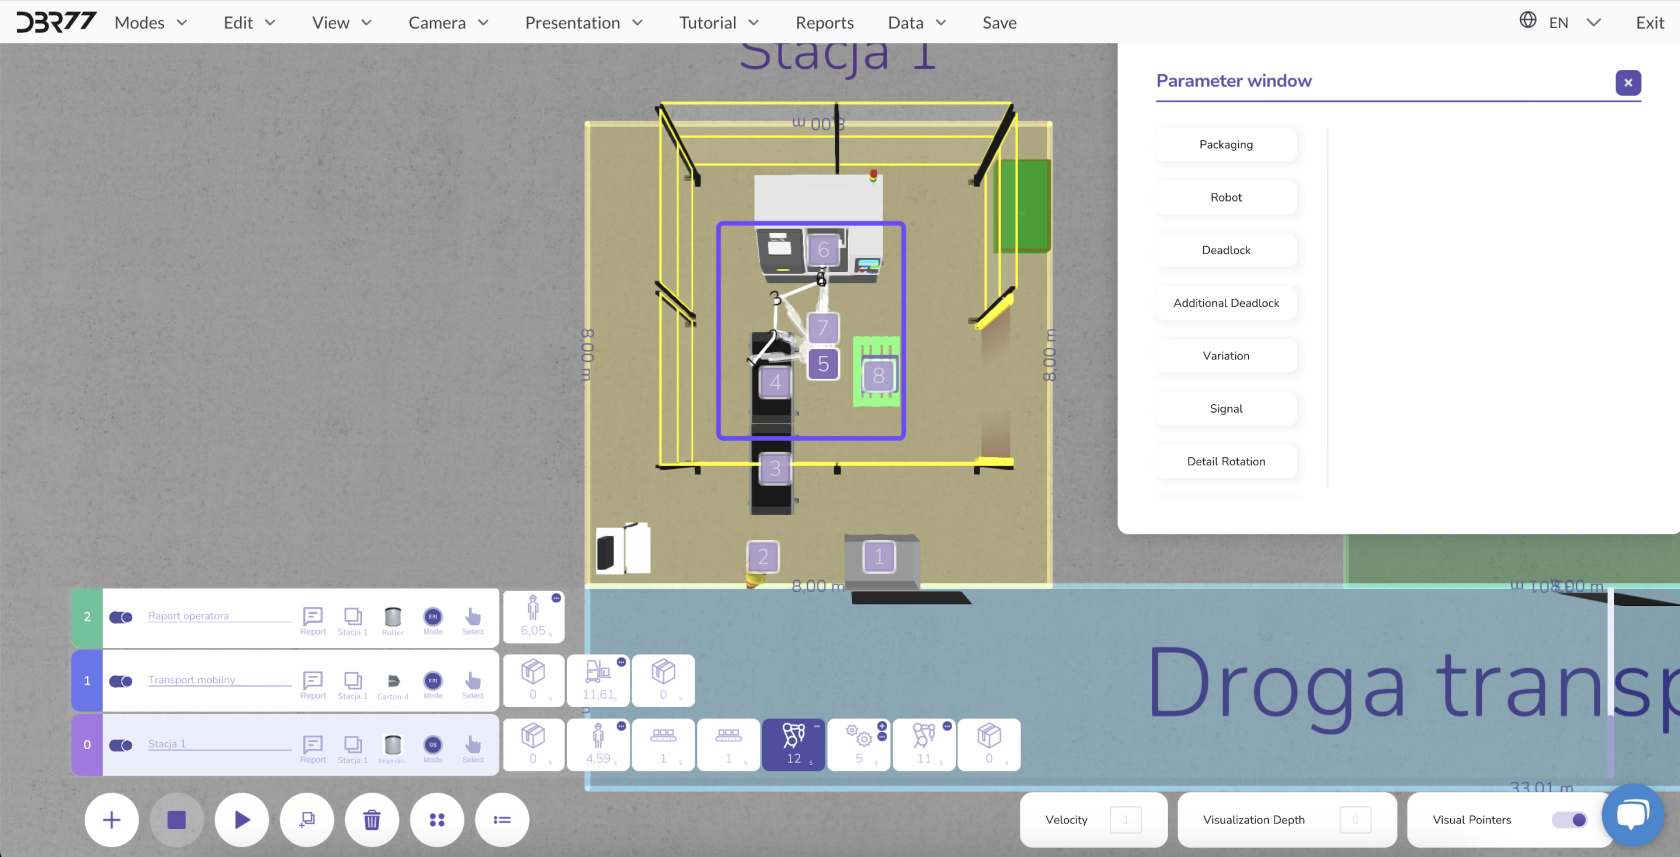
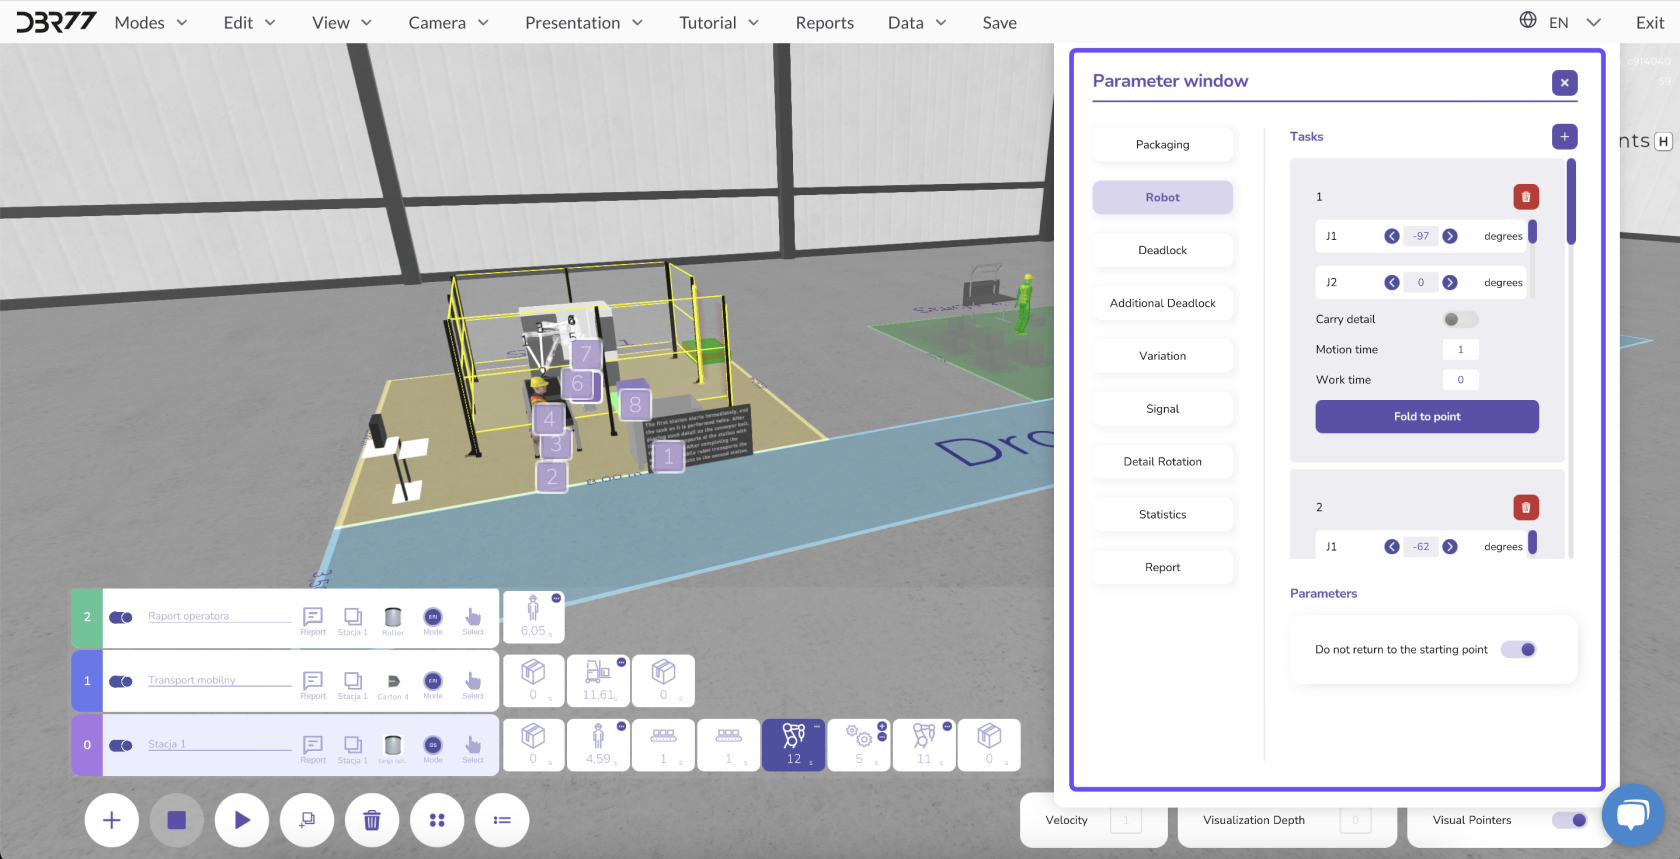
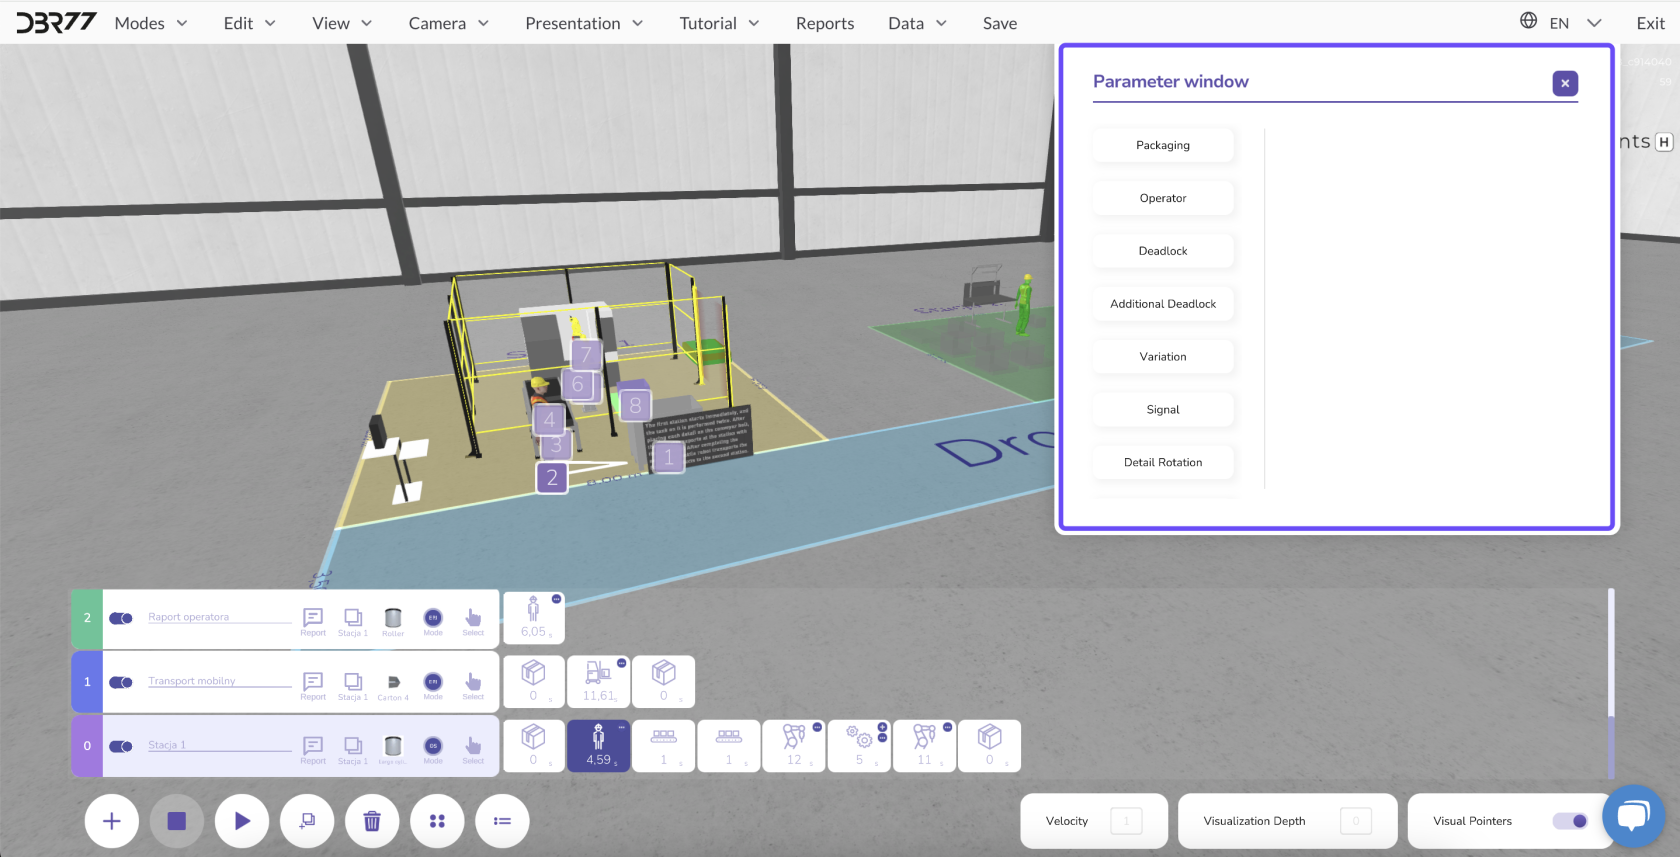
# Parameter Window
The parameter window in animation mode enables detailed control of the properties and behavior of individual elements in the scene. Depending on the element type—whether an operator, robot, conveyor, machine, or component—the available options and parameters may vary.
[](https://learn.dbr77.com/uploads/images/gallery/2024-10/PzslududSqJDgm0B-image.png)
[](https://learn.dbr77.com/uploads/images/gallery/2024-10/ET83aU7MjjpJWAh5-image.png)
[](https://learn.dbr77.com/uploads/images/gallery/2024-09/x4IDz3yBaBnP7T0g-gify2-29.gif)
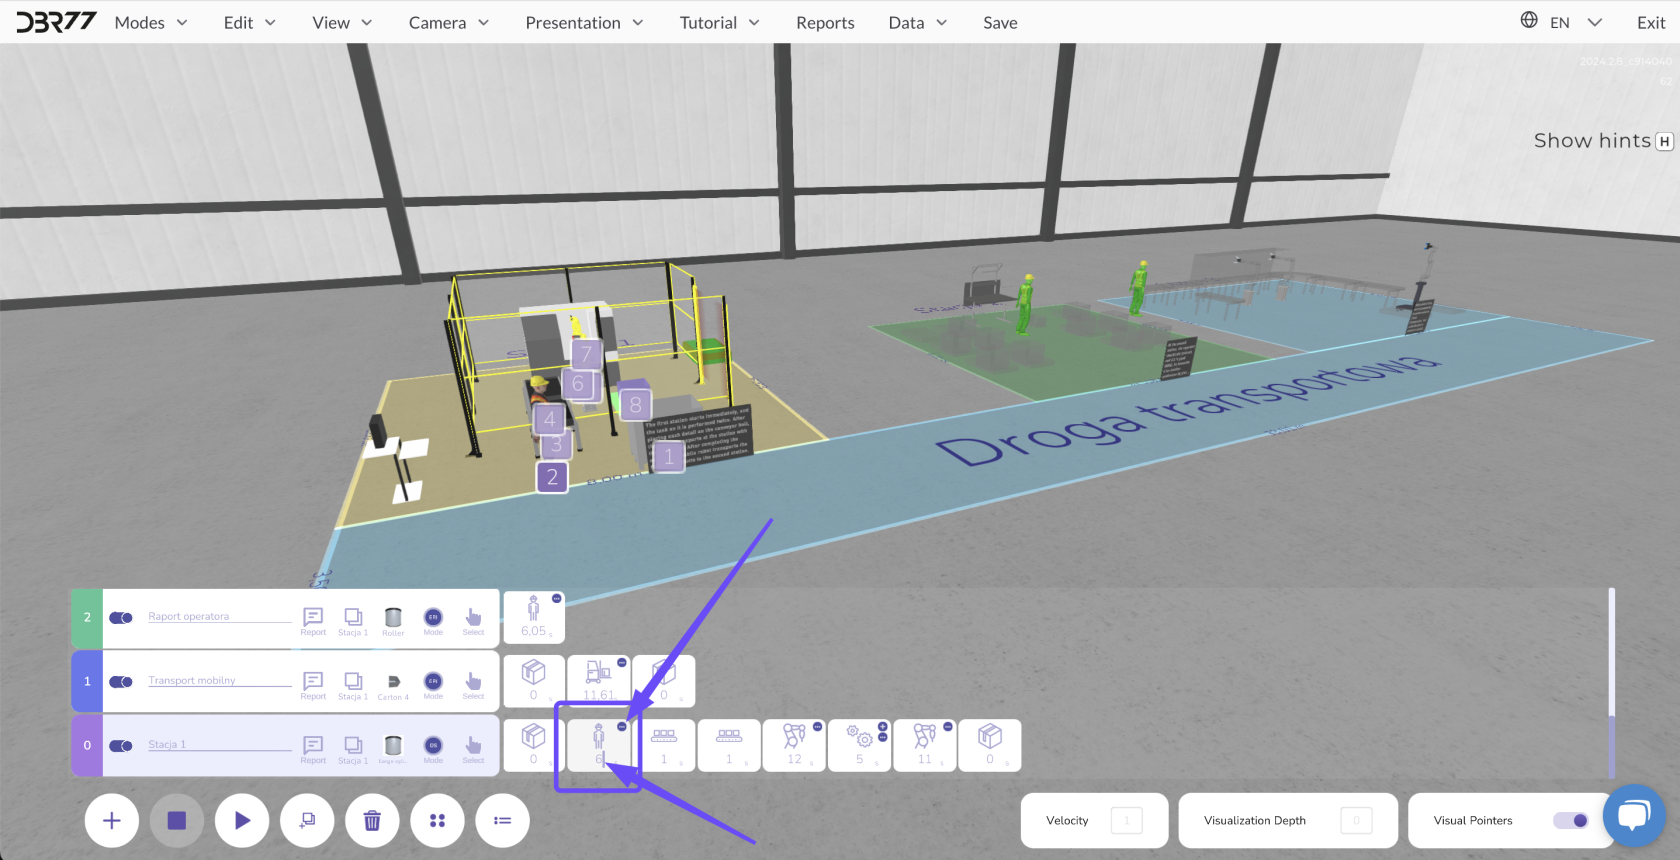
### **Control of Element Working Time:**
The primary method for controlling the working time of elements is by editing the animation timeline. In the "Duration" field, you can enter the desired number of seconds for a task and confirm the change with Enter.
[](https://learn.dbr77.com/uploads/images/gallery/2024-10/RFiKiJFMAVhP5Rt2-image.png)
[](https://learn.dbr77.com/uploads/images/gallery/2024-09/A91JeujgPrjP1iHK-gify2-30.gif)
#### **Detailed Parameter Editing:**
To access advanced options, click on the desired element and navigate to its details. This opens the parameter window, where you can adjust various aspects of the object's functionality.
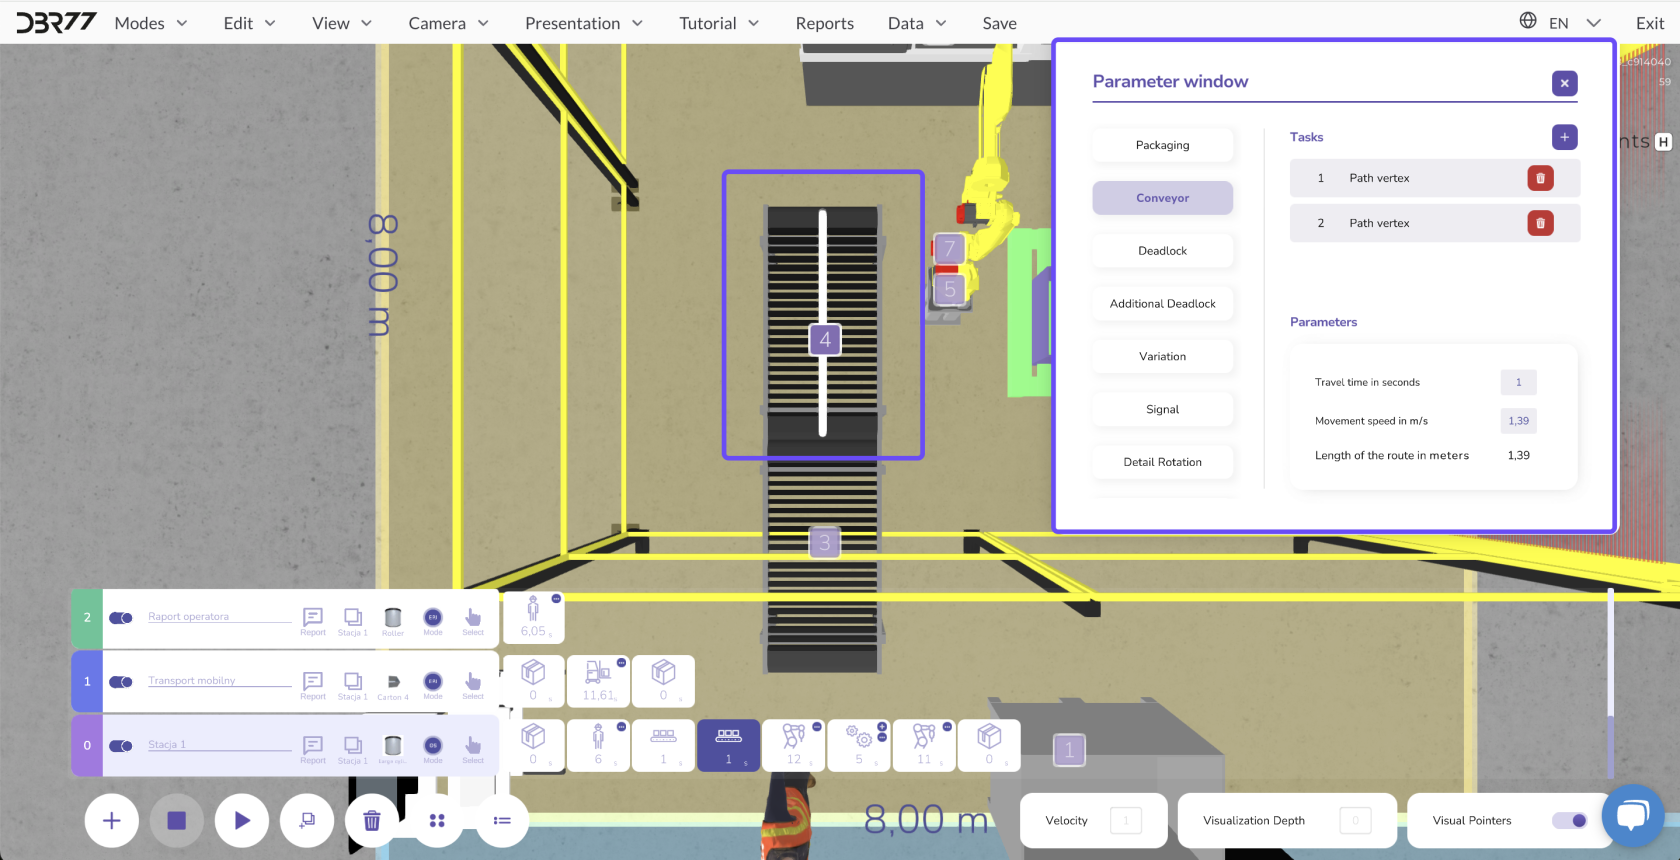
#### **Changes in the Parameter Window:**
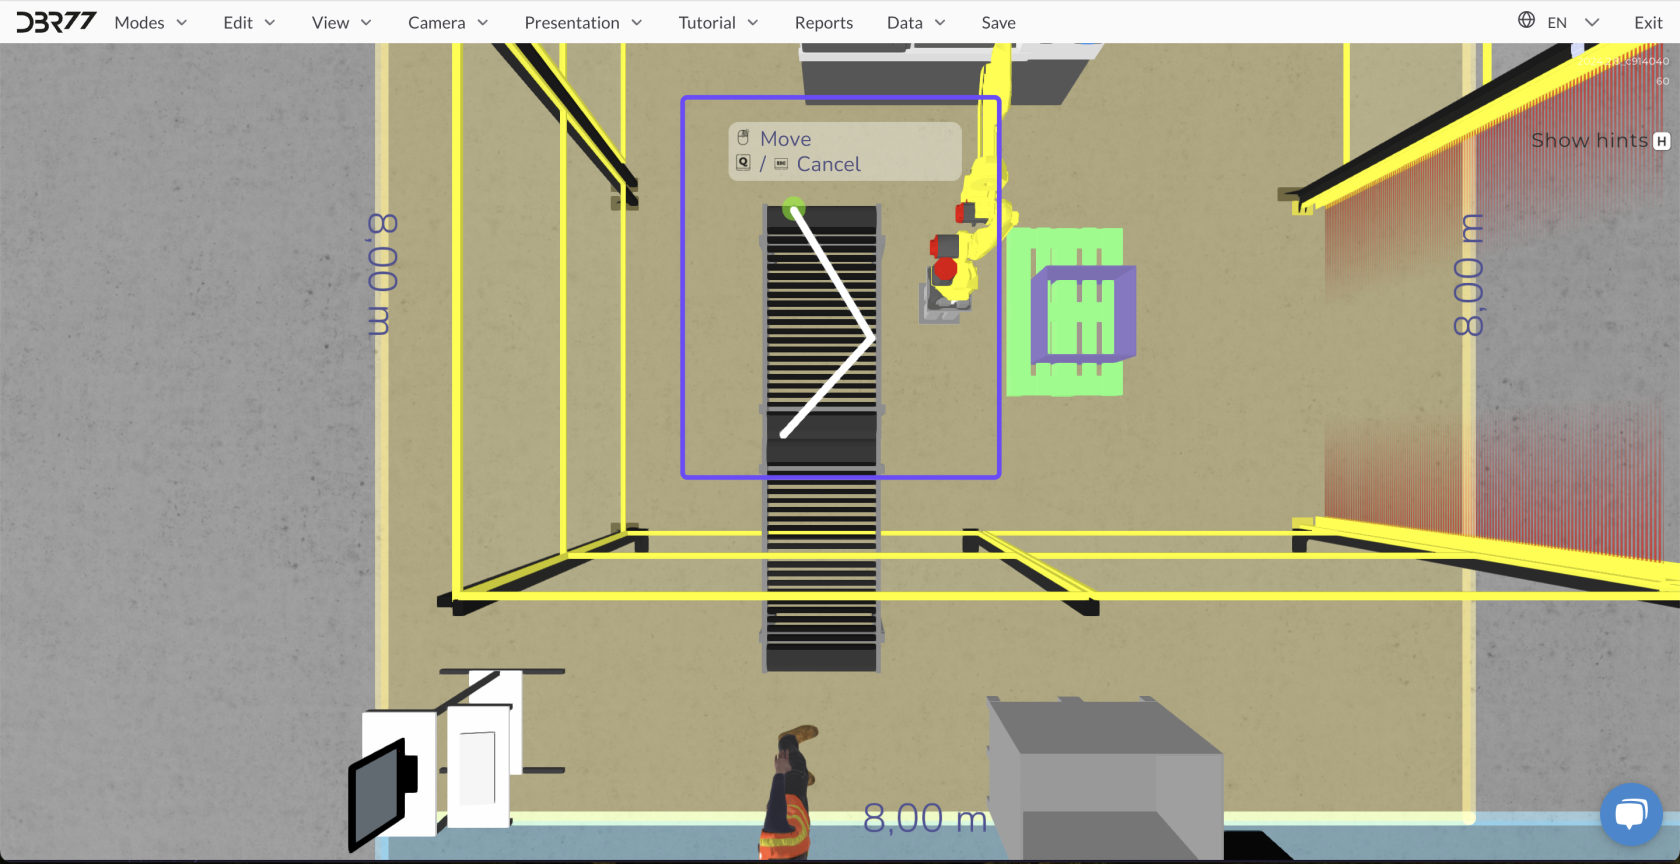
- **Route of Moving Elements:**
- Edit the movement routes of elements such as operators, robots, or conveyors. Route adjustments are crucial to optimizing movement flow and avoiding bottlenecks.
- Select the name of the desired element in the parameter window and define the movement vertices. Confirm the position of each edited vertex with a right-click.
[](https://learn.dbr77.com/uploads/images/gallery/2024-10/94J8QSt5BThwiPgj-image.png)
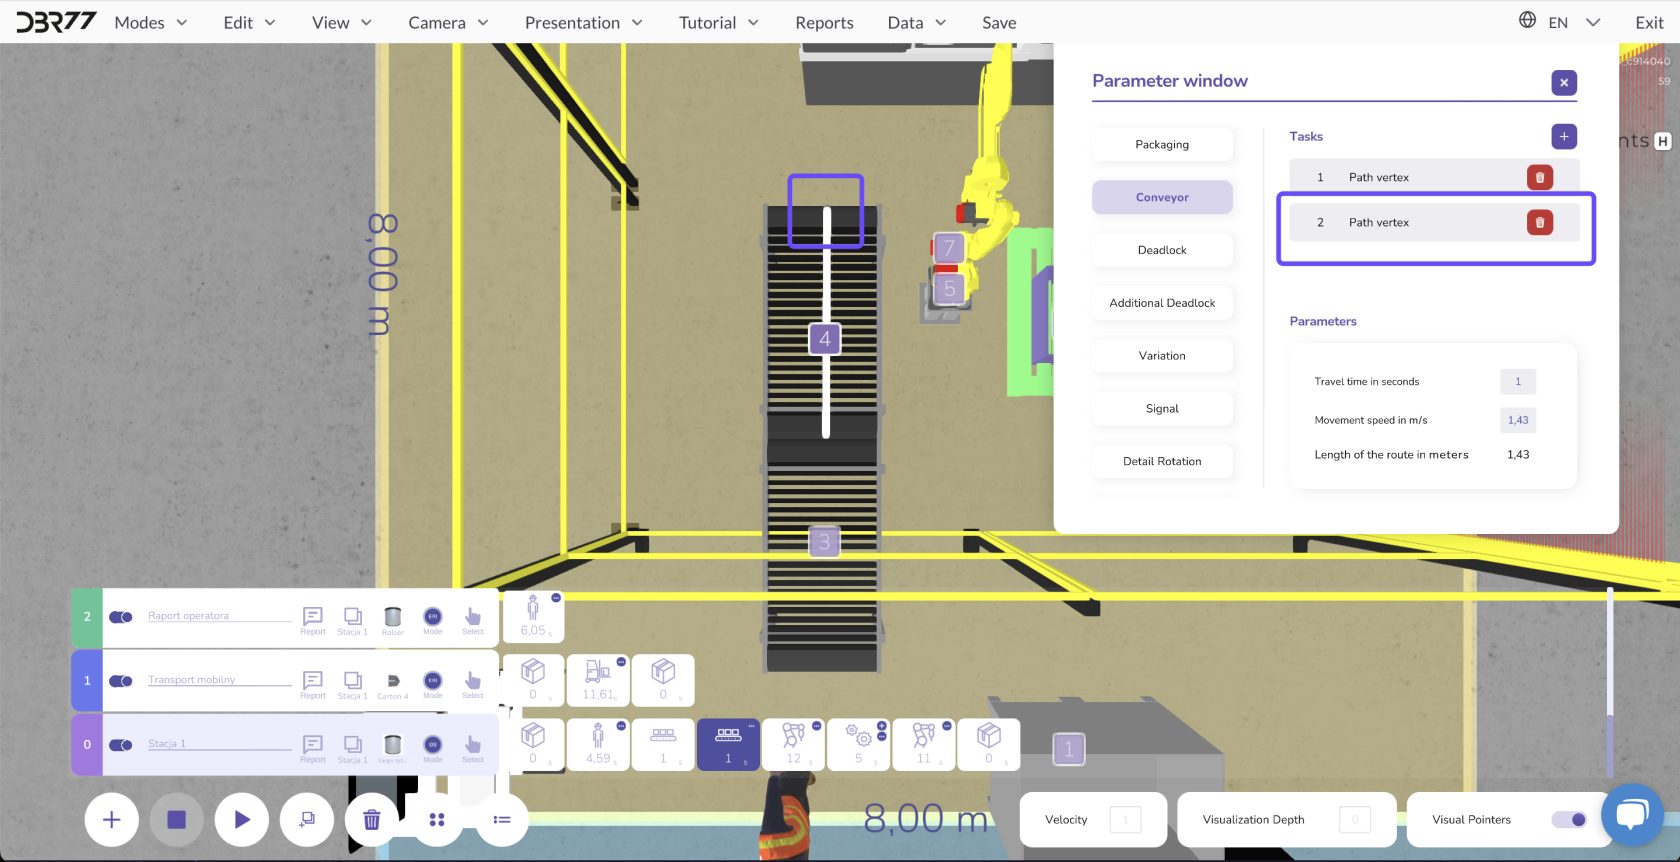
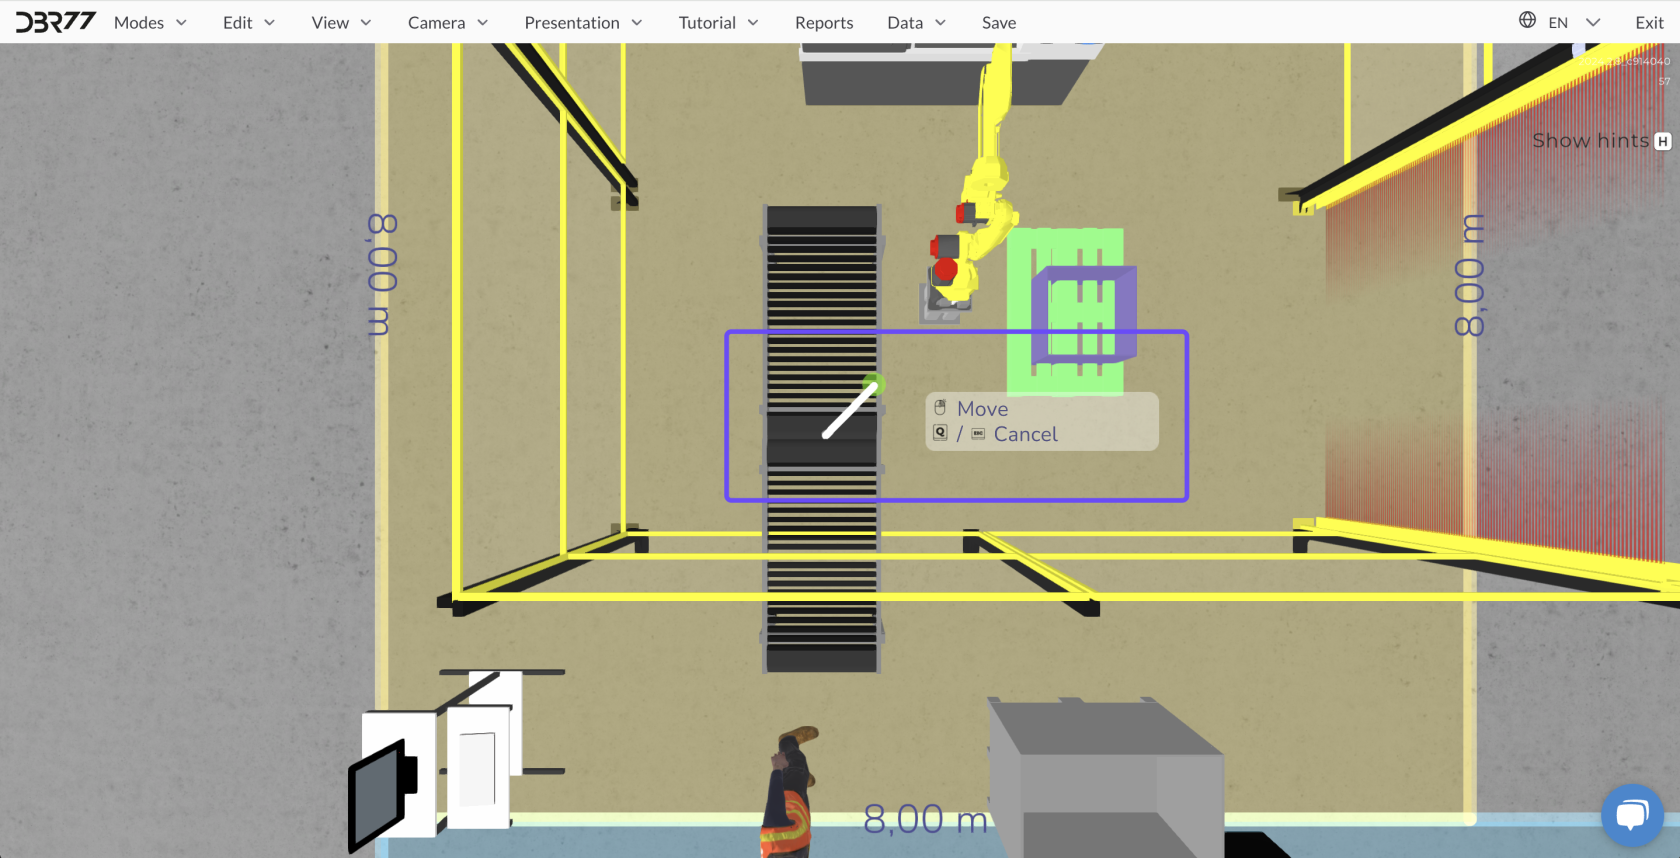
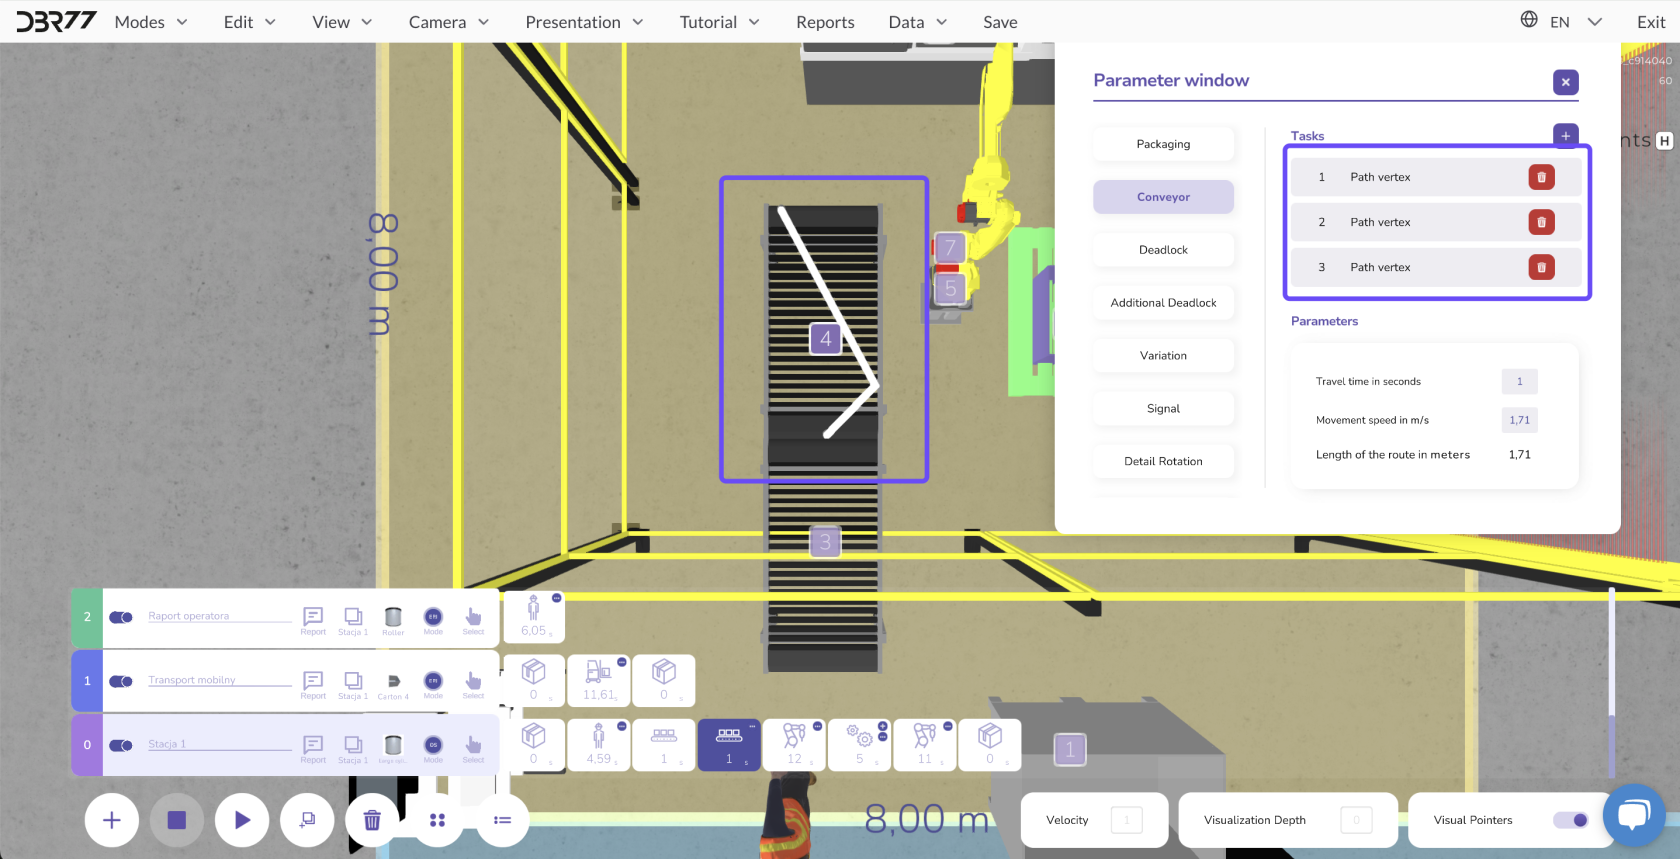
- To modify a route, select the vertex to be edited from the list, drag it to the desired position, and confirm the new location with a **right-click**.
[](https://learn.dbr77.com/uploads/images/gallery/2024-10/bGvV1Wgr9jOOSuXx-image.png)
[](https://learn.dbr77.com/uploads/images/gallery/2024-10/Umdk4lRd7pAOBMEB-image.png)
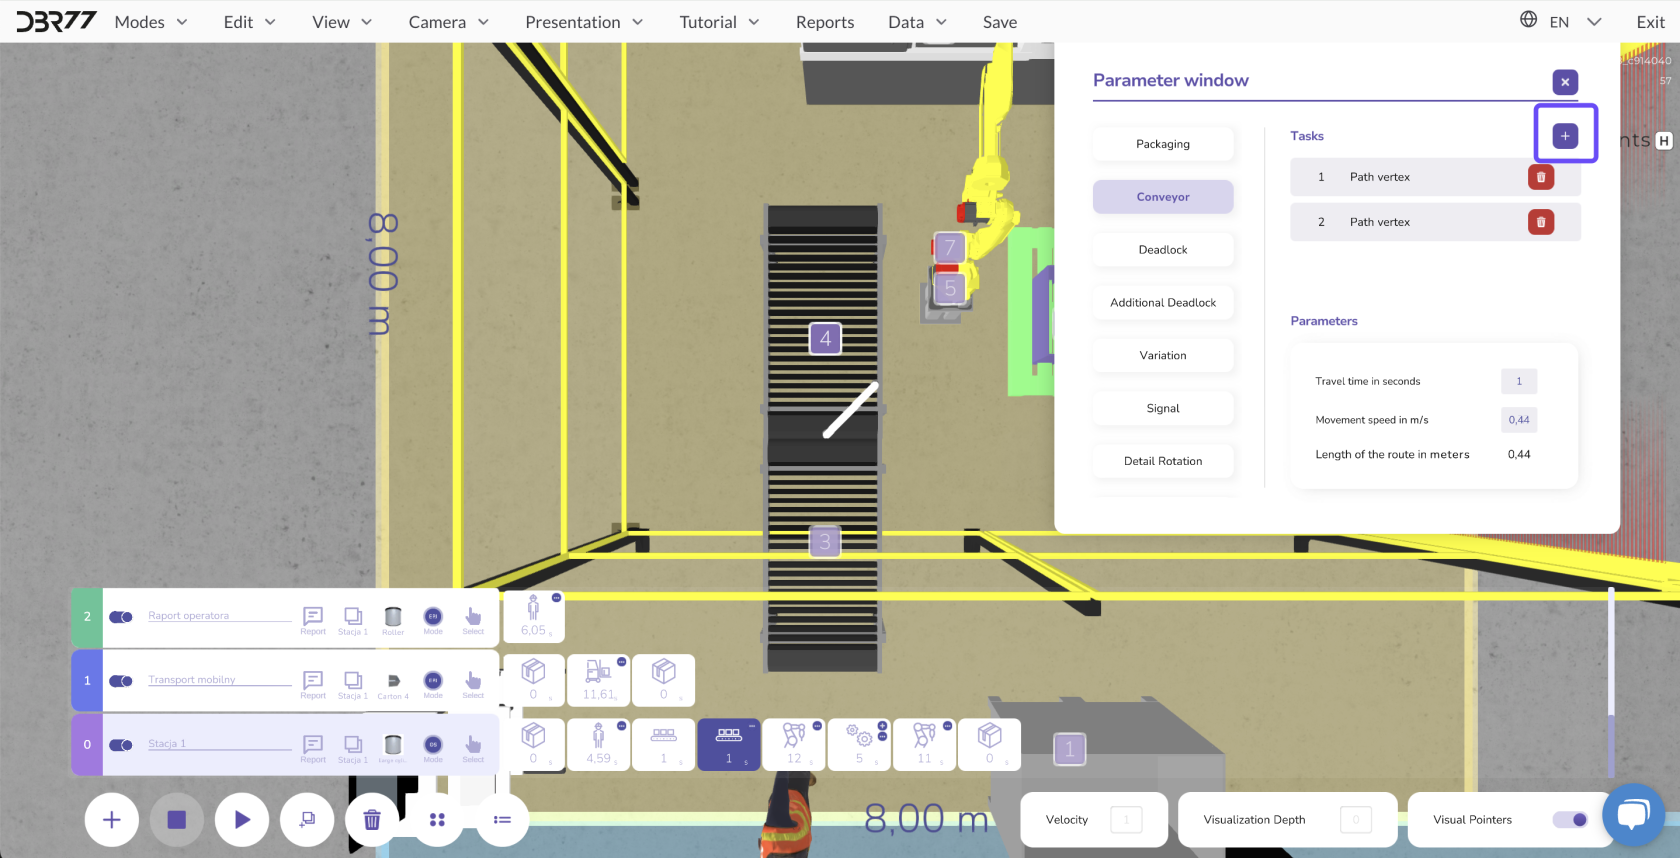
- Add additional vertices by clicking the "+" button and setting the position of the new vertex.
[](https://learn.dbr77.com/uploads/images/gallery/2024-10/IvPZq81kysatyD1D-image.png)
[](https://learn.dbr77.com/uploads/images/gallery/2024-10/FKMLTgLfql28onTZ-image.png)
[](https://learn.dbr77.com/uploads/images/gallery/2024-10/MZitevr2Ey54A2TQ-image.png)
[](https://learn.dbr77.com/uploads/images/gallery/2024-09/Fo9dALjIlyx5RuPr-gify2-32.gif)
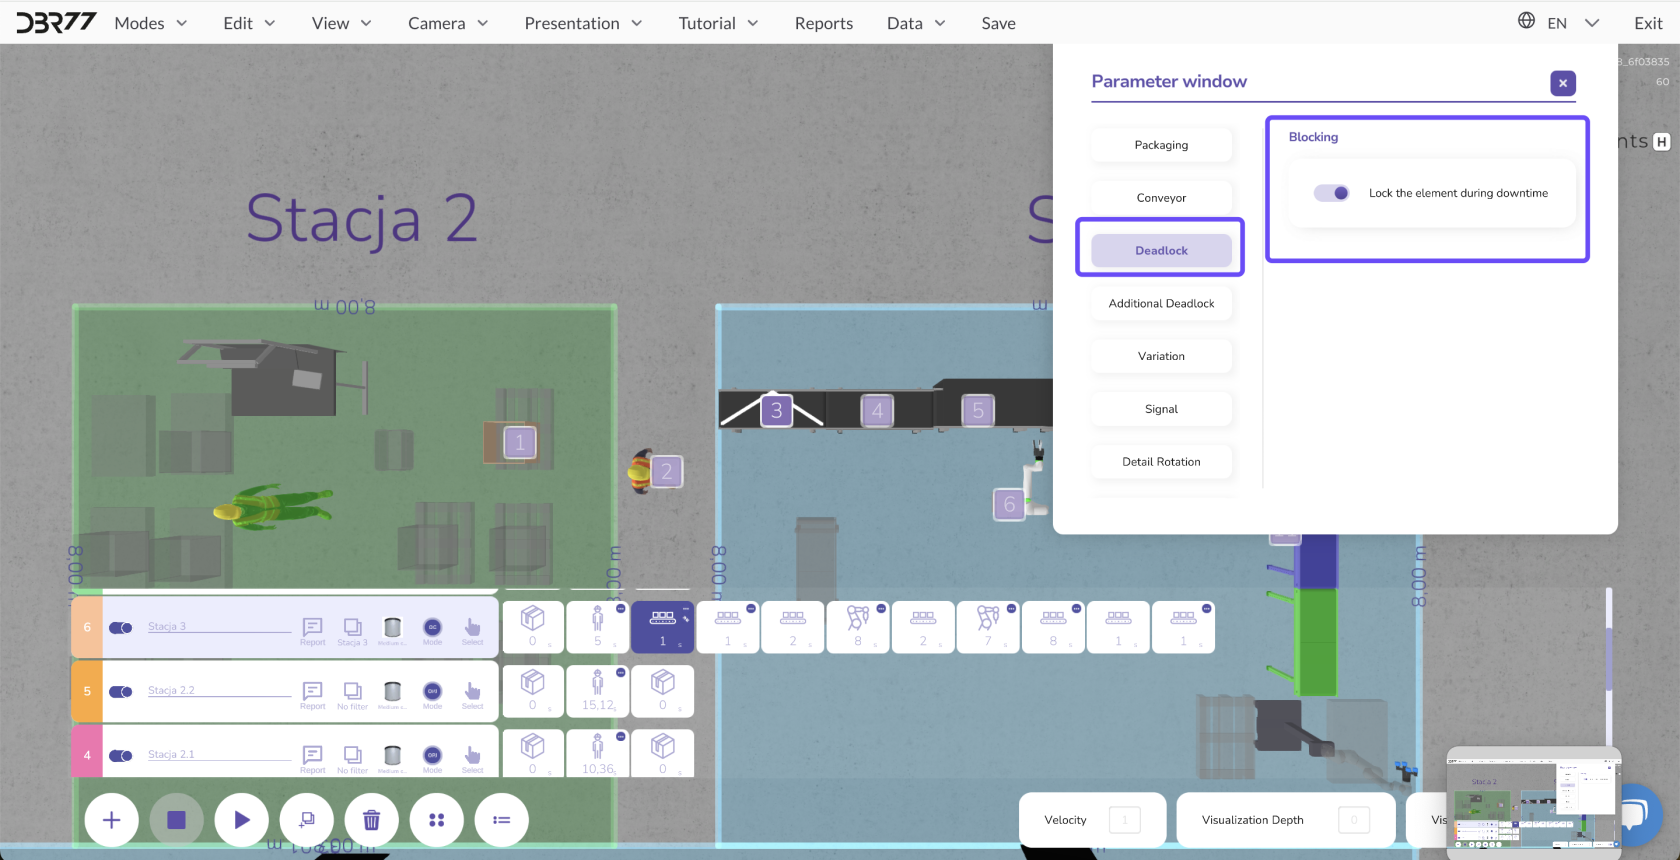
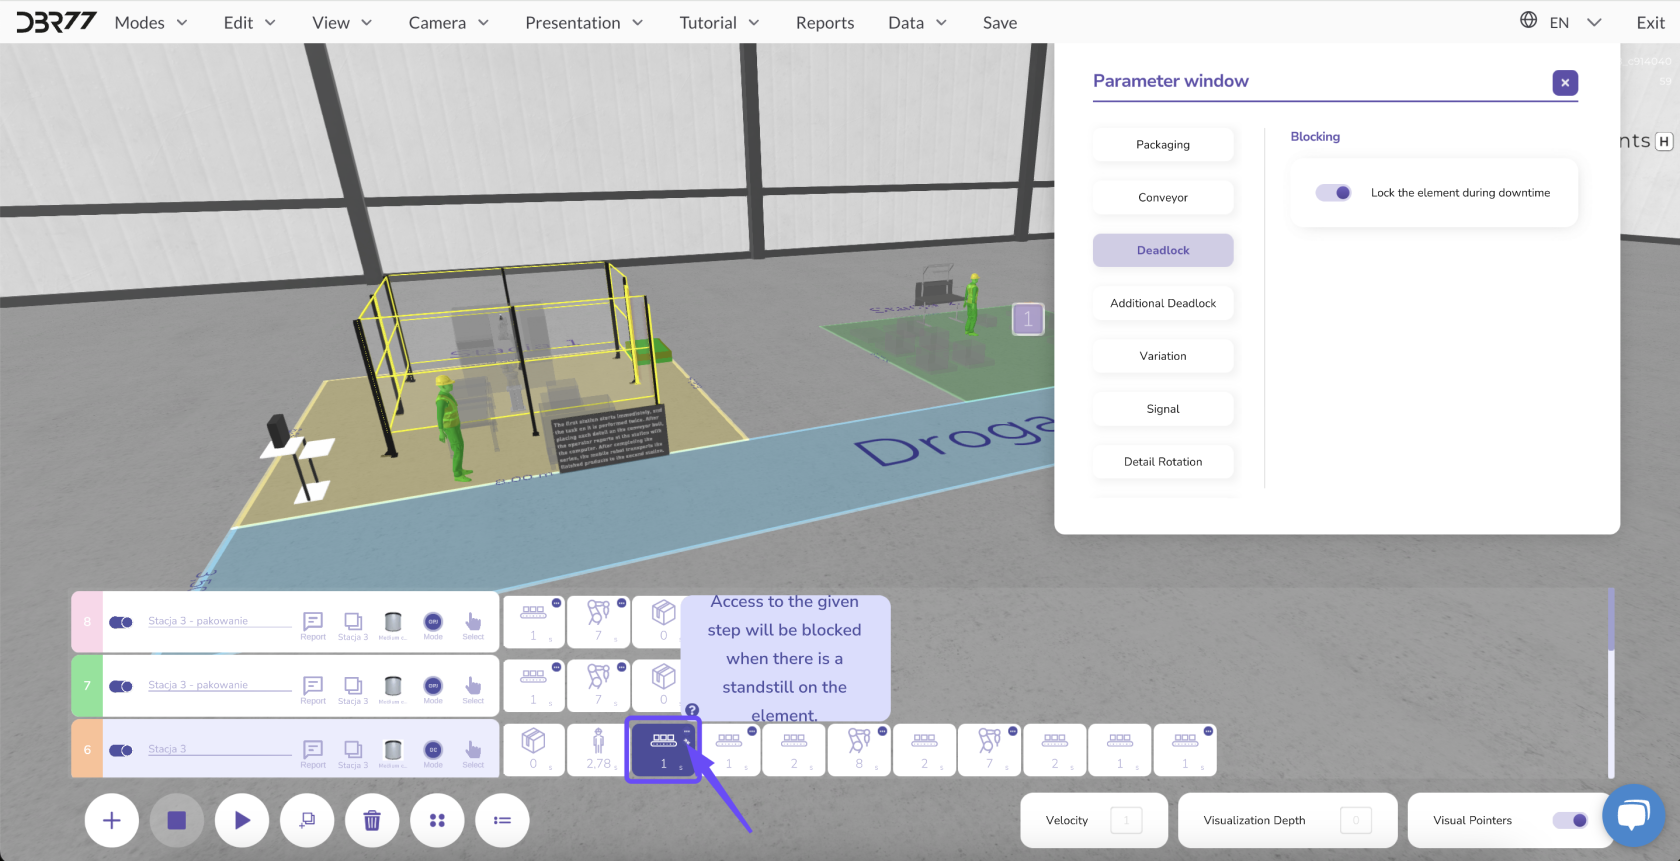
#### **Locking Elements:**
- Locking selected elements prevents bottlenecks at specific points in the scene. Locking an element blocks its movement or action, aiding in better planning and control of the overall animation.
[](https://learn.dbr77.com/uploads/images/gallery/2024-09/GxvQFIn6o6CCREt6-image.png)
#### [](https://learn.dbr77.com/uploads/images/gallery/2024-10/o6Wa3fFNtD2K6sKC-image.png)
#### **Movement Decisions for Operators and Robots:**
- Define whether operators, robots, or carts should return to their starting point or remain at the task completion location after finishing their work.
- Assign a custom speed to these elements as needed.
[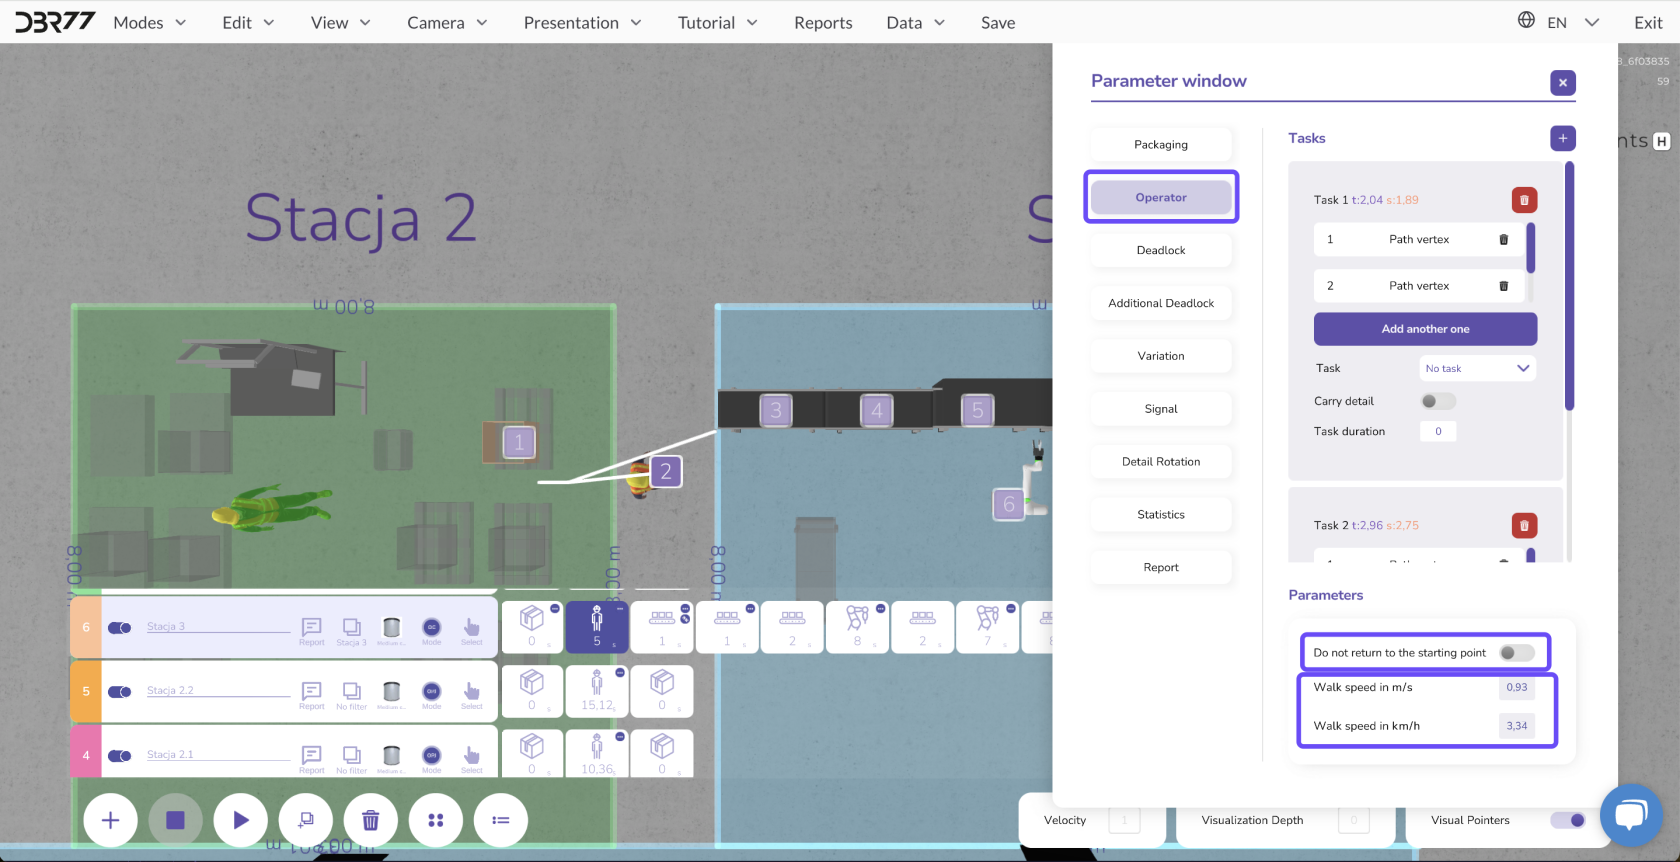](https://learn.dbr77.com/uploads/images/gallery/2024-09/5xPumwmPAIVsWUW9-image.png)
#### **Tasks Related to Component Transport:**
- Determine whether the movement of a specific element should be linked to the transport of a component. This is crucial for setting the route and execution time of tasks.
[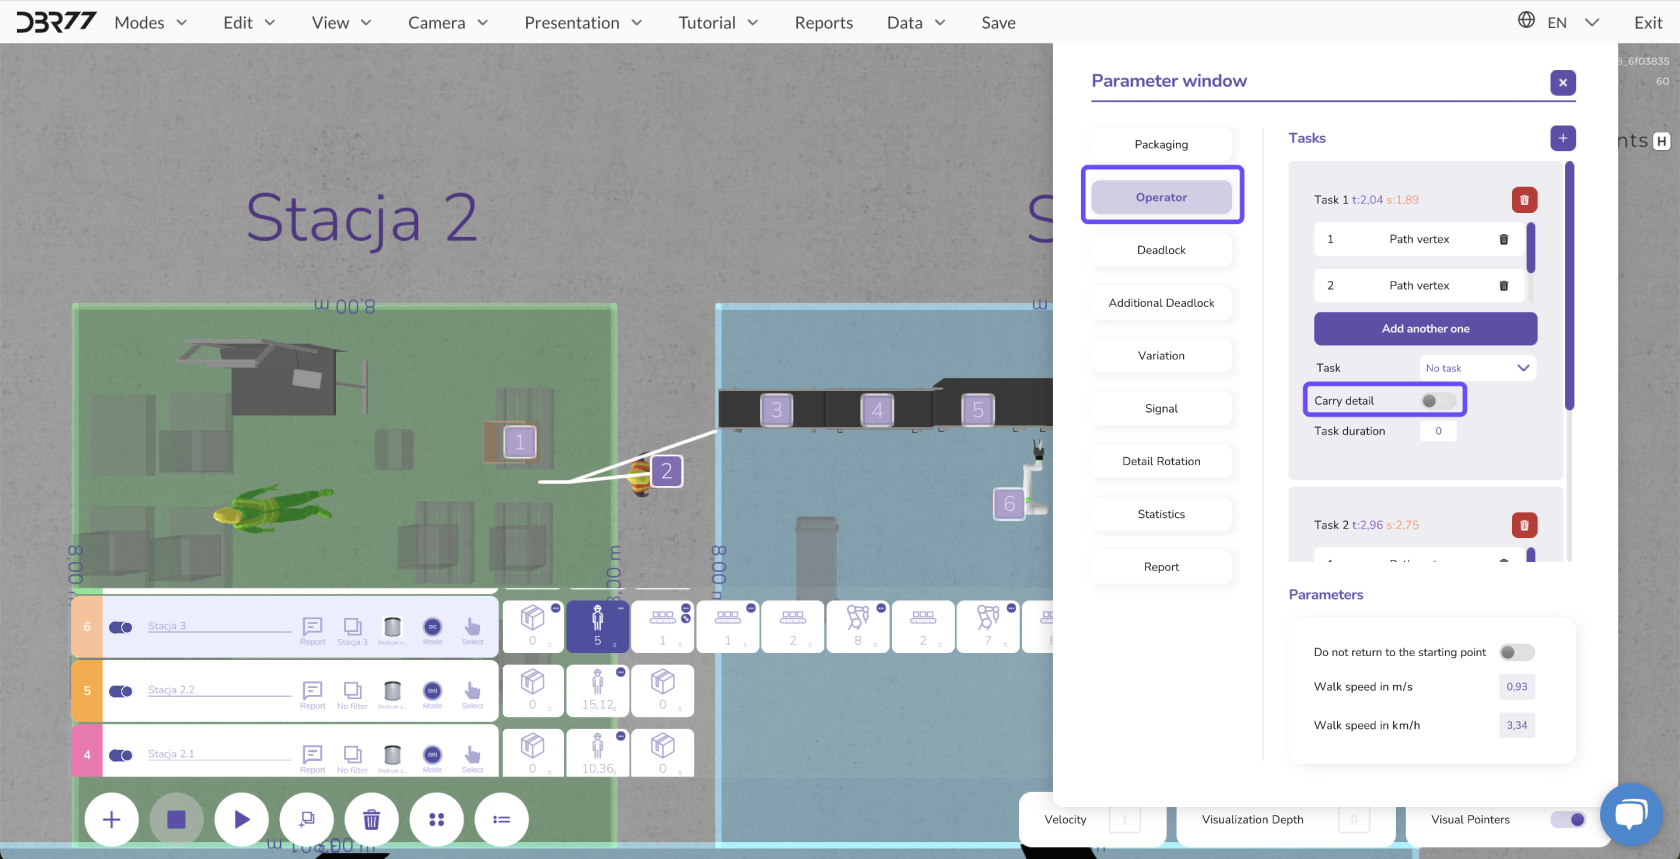](https://learn.dbr77.com/uploads/images/gallery/2024-09/vua3f8LrTKmWAGfS-image.png)
#### **Sending Signals to Trigger Animation:**
- Configure which signal a specific element sends in the parameter window. This signal controls the next steps in the animation, enabling targeted process management.
[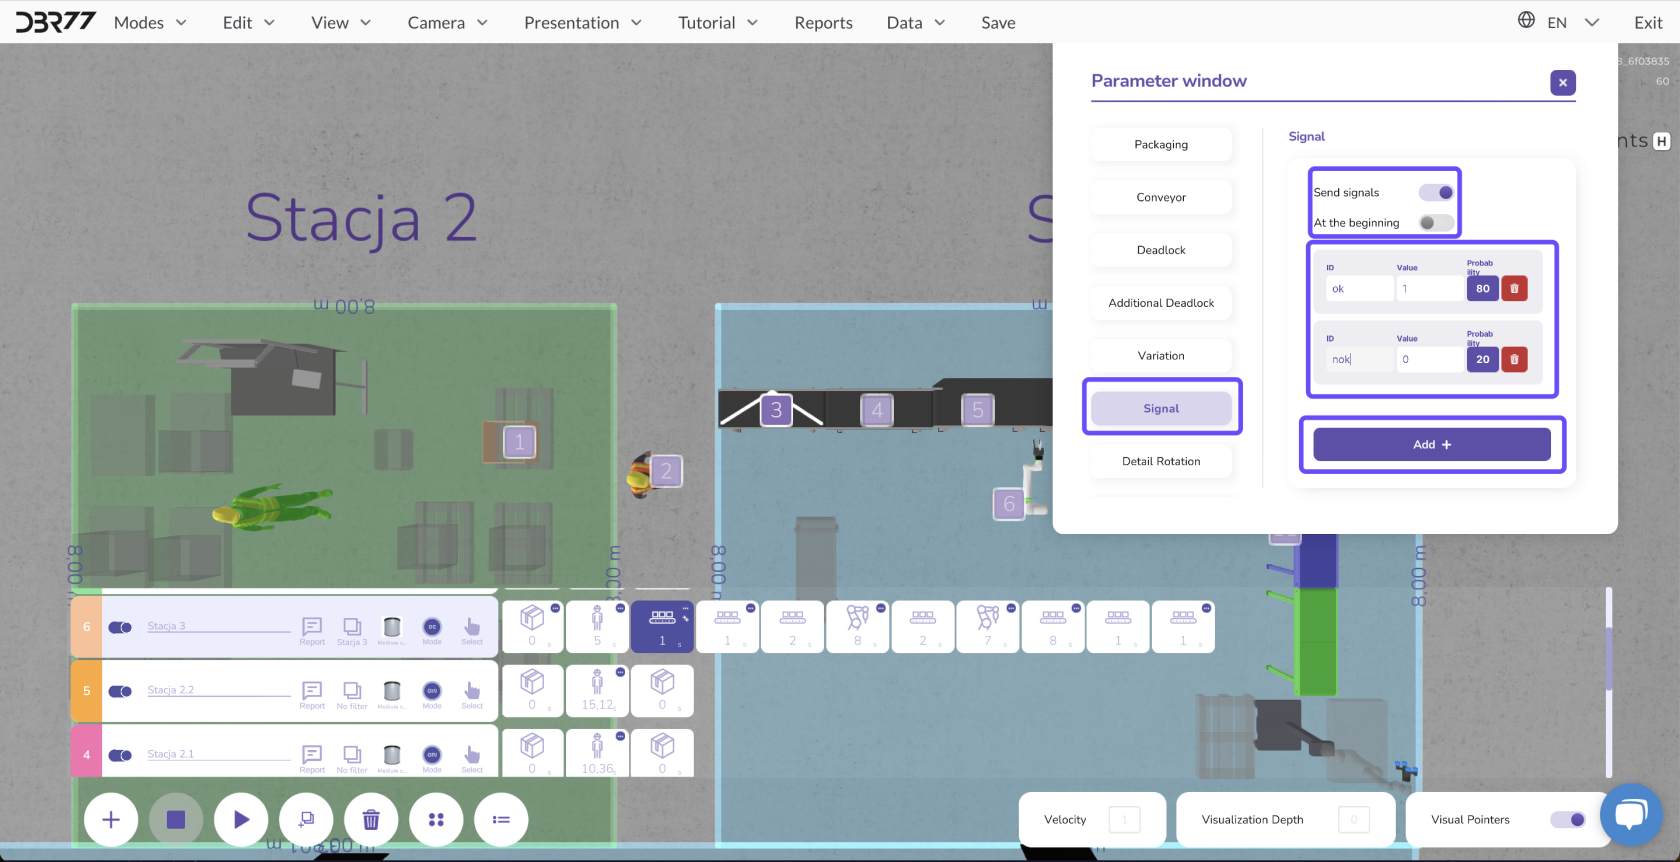](https://learn.dbr77.com/uploads/images/gallery/2024-09/lgDG84mo8ugcuZ7o-image.png)
#### **Practical Application of Parameters:**
- By managing parameters effectively, you can precisely control the animation, optimize the movements of machines and personnel, and reduce the risk of production downtimes. This tool allows flexible customization of all aspects of element functionality to meet the requirements of any scenario.
# Configuring Components
Configuring components in the animation process enables a more precise visualization of your production processes. You can control components in various ways, modify their appearance and orientation, and adjust settings during the animation to align them with specific process steps.
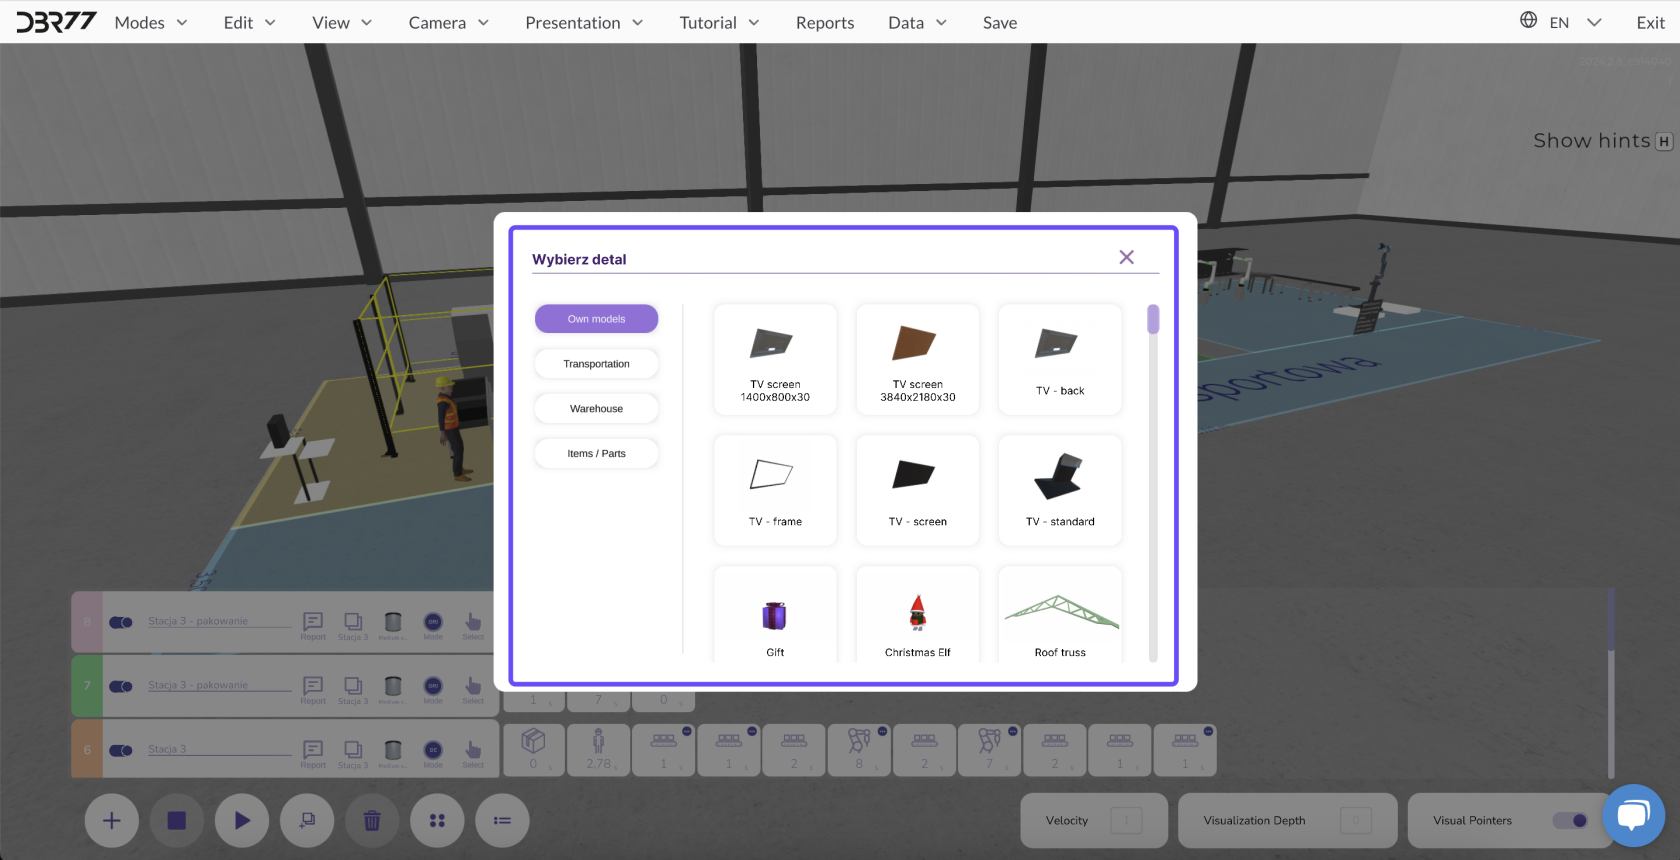
### **Setting Up Input Components:**
[](https://learn.dbr77.com/uploads/images/gallery/2024-10/5hxydEbzVnjNF8Q5-image.png)
1. To add an input component to the animation, first select the desired model from the available options.
2. The input component represents the item being processed during the simulation. It can be introduced at the start of the production process or at any step of the animation, depending on the requirements.
[](https://learn.dbr77.com/uploads/images/gallery/2024-10/XO6Ea6UYEzC6nJCL-image.png)
#### Modifying Components During the Animation:
[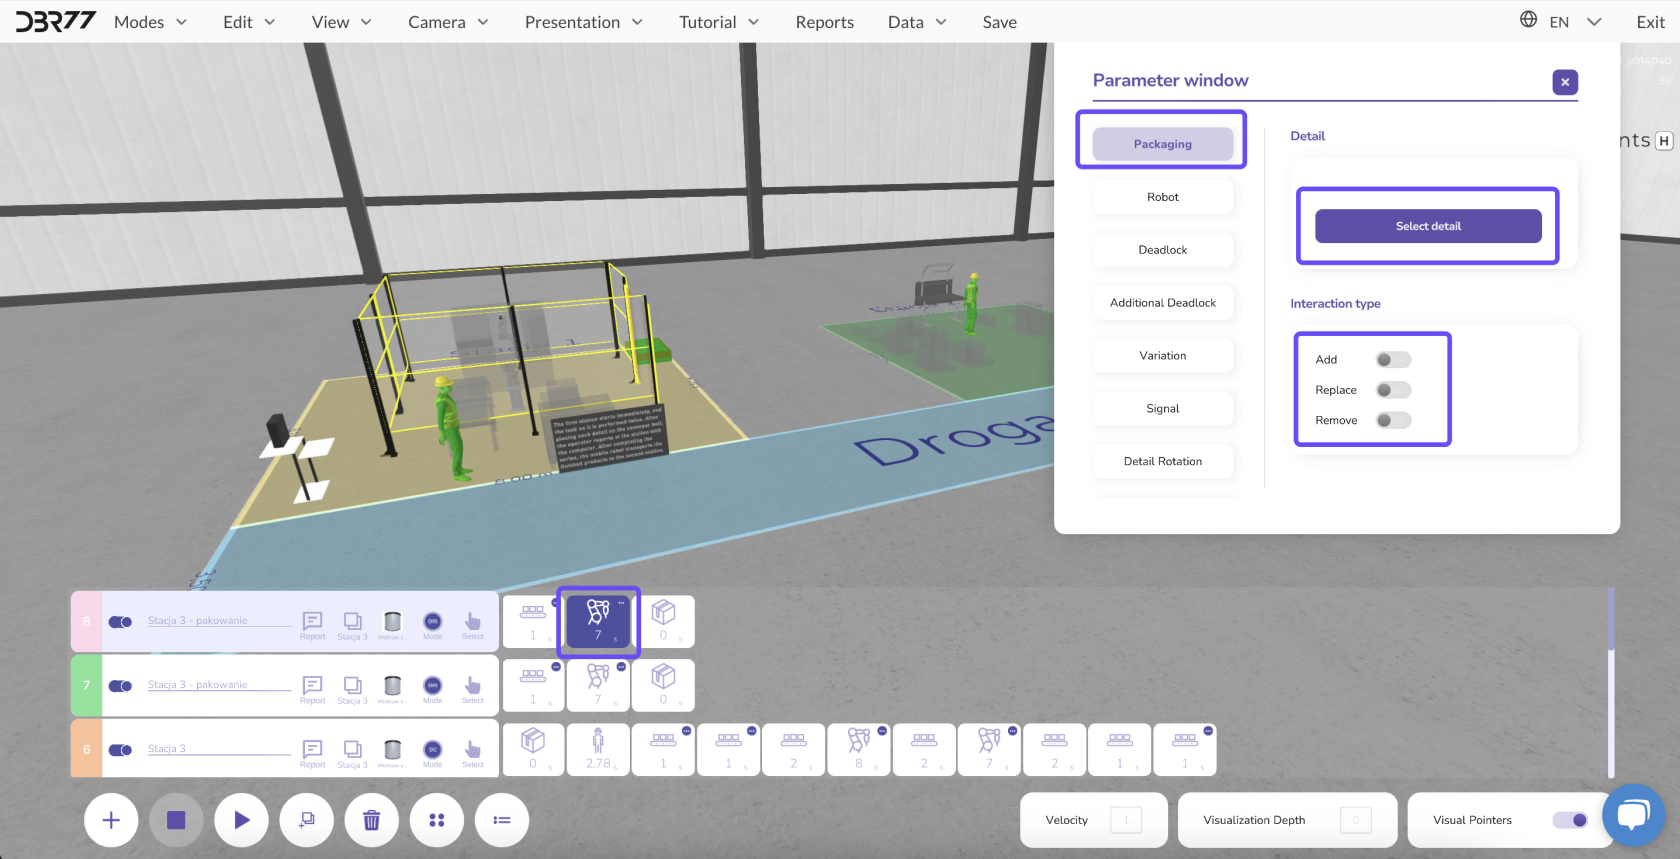](https://learn.dbr77.com/uploads/images/gallery/2024-10/YXyJflsuxa5vqhIY-image.png)
1. You can assign different components at various stages of the animation. For example, a component on the conveyor belt can undergo multiple processing steps, transforming into another component.
2. Open the parameter window for the specific animation step to change the component.
3. Select the new component to appear at that phase.
This approach allows you to depict the entire production cycle, from raw materials to finished products.
You can add, replace, or remove components as needed.
#### Rotating Components:
[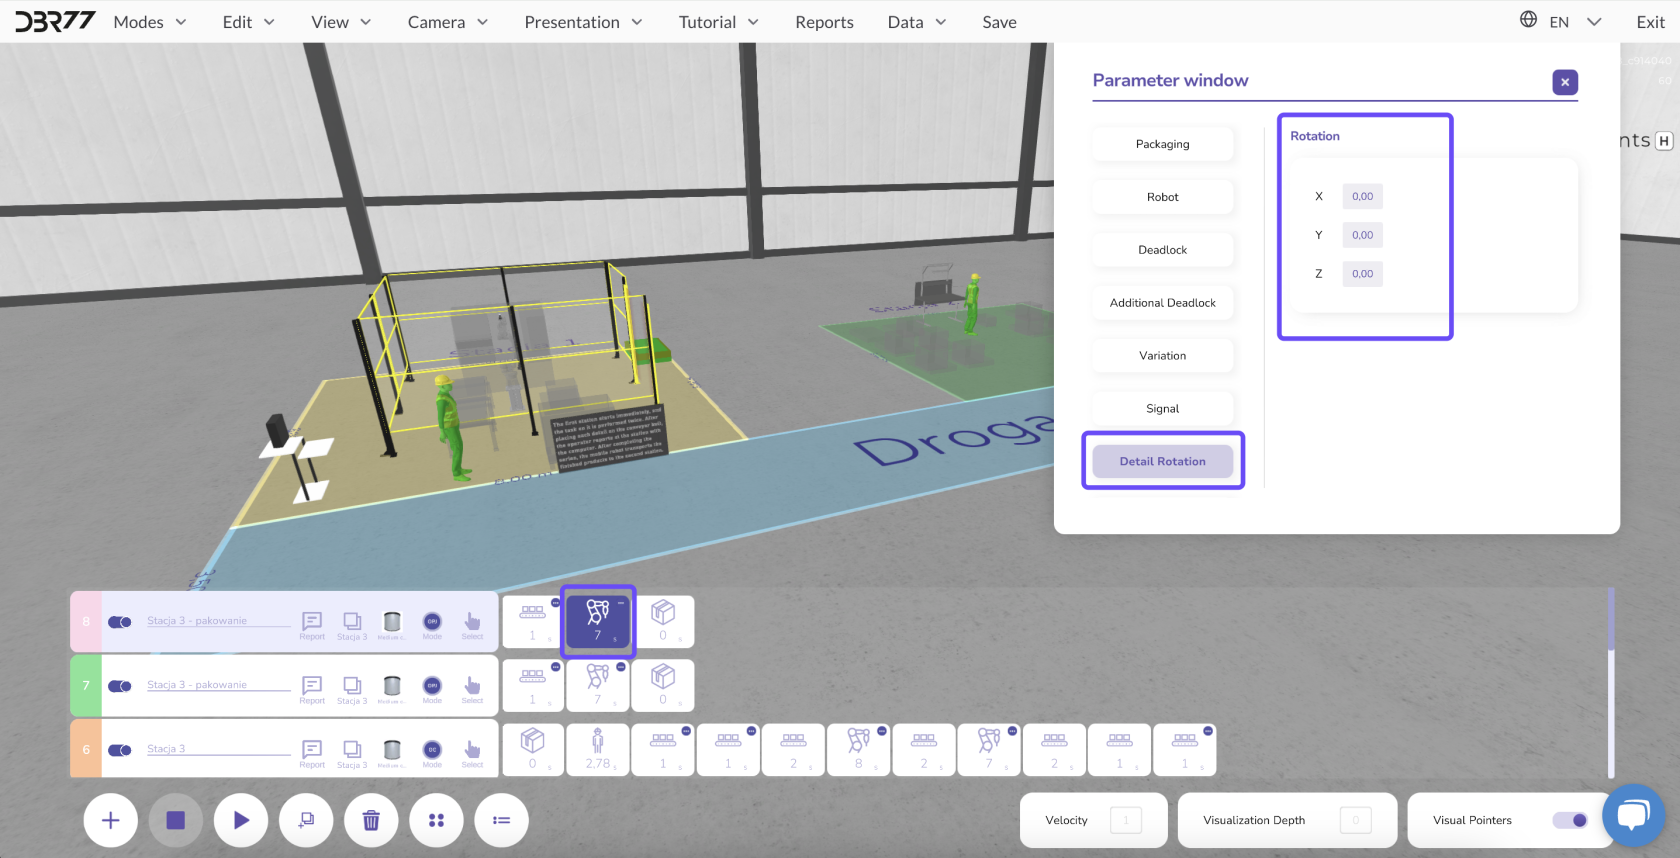](https://learn.dbr77.com/uploads/images/gallery/2024-10/QXW2aOgXX4HjYk35-image.png)
In the animation's parameter window, you can also rotate the component to adjust its orientation.
- This is useful when a component is misaligned on the conveyor belt and needs correction by an operator or robot.
- To rotate the component, enter the desired values in the parameter window and confirm the changes.
By managing components at every stage of the animation, you maintain full control over the production process and its visualization.